第一次接触开发板这种比价好玩的东西,但是不是很熟练,特此开贴记录。
(以及网上根本没人写怎么用EMQX,阿里云的又看不懂,所以只好自己摸索)
安装并配置软件开发环境
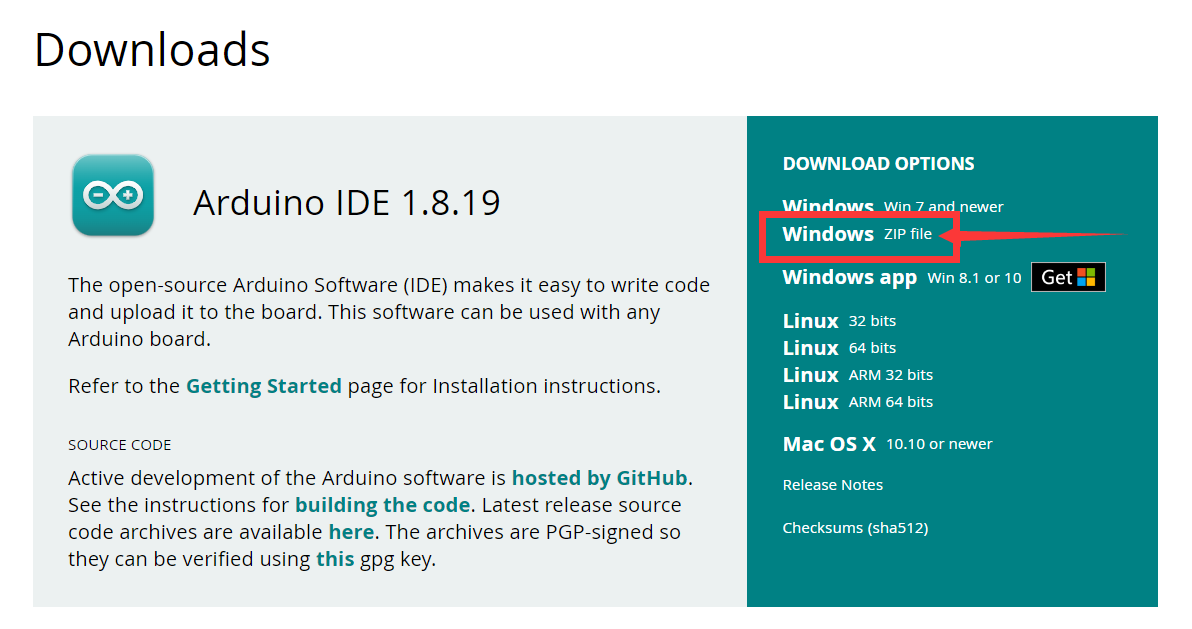
下载软件包
打开官网,点击Windows ZIP file
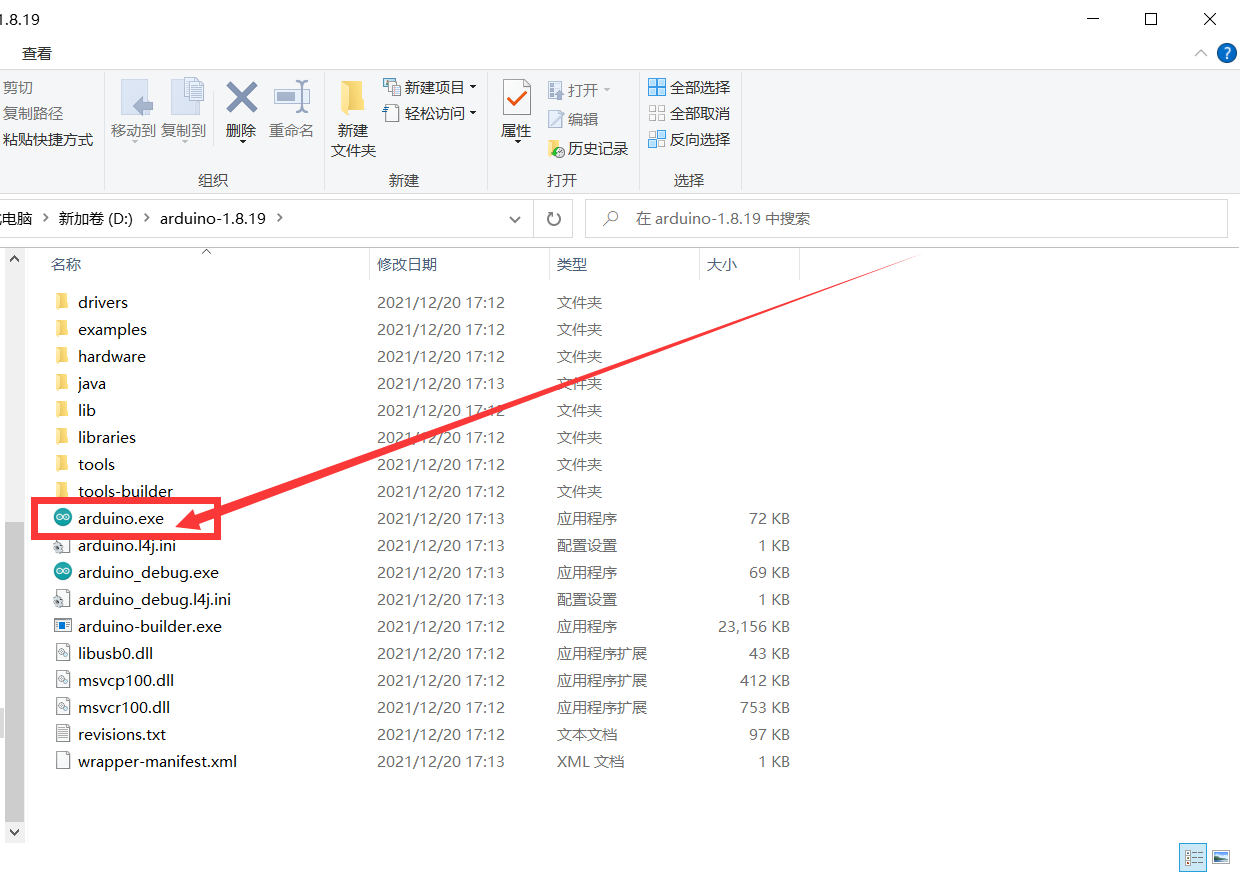
下载完成后解压在平常安装软件的地方,进入文件夹,找到arduino.exe,双击打开主程序。
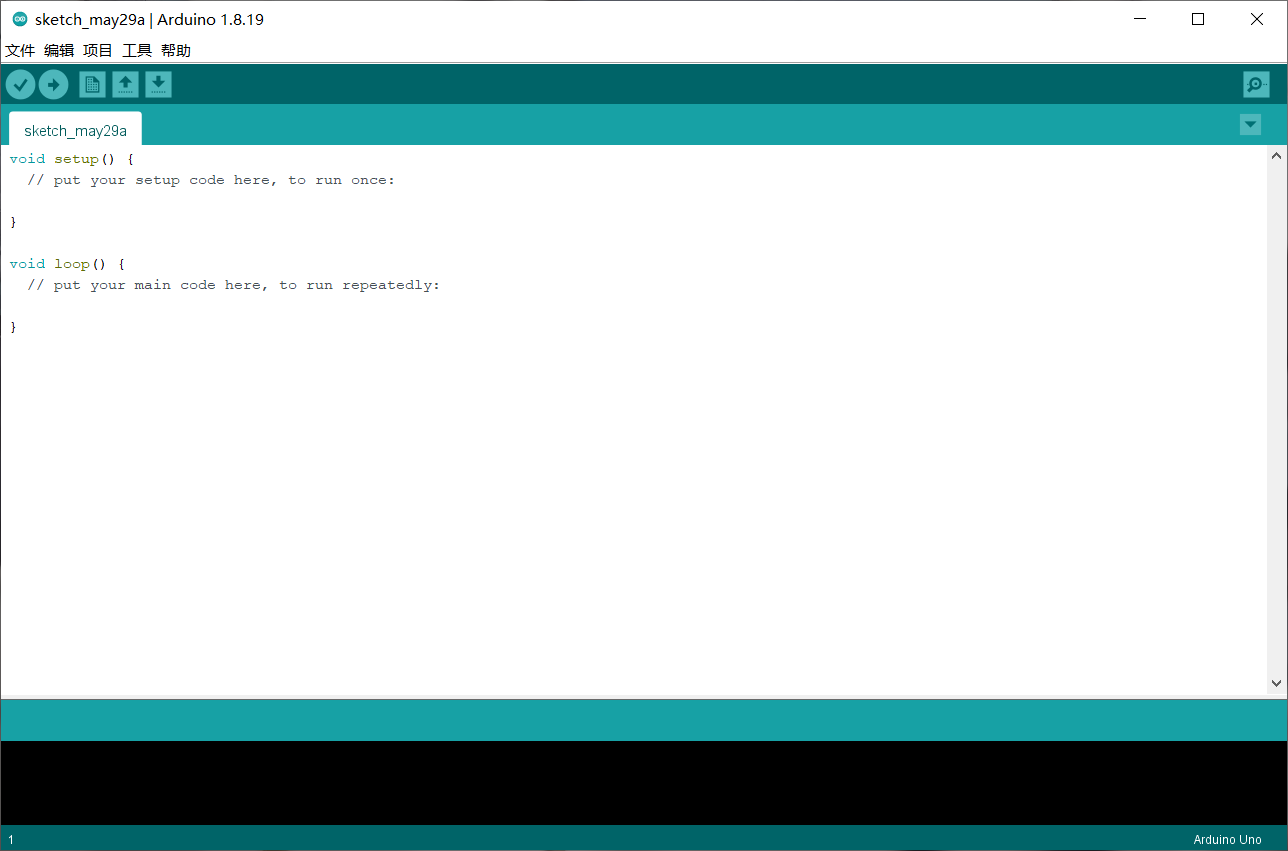
配置ESP8266开发环境
点击界面左上角文件 – 首选项

将地址填入下面的附加开发板管理器网址中:
https://arduino.esp8266.com/stable/package_esp8266com_index.json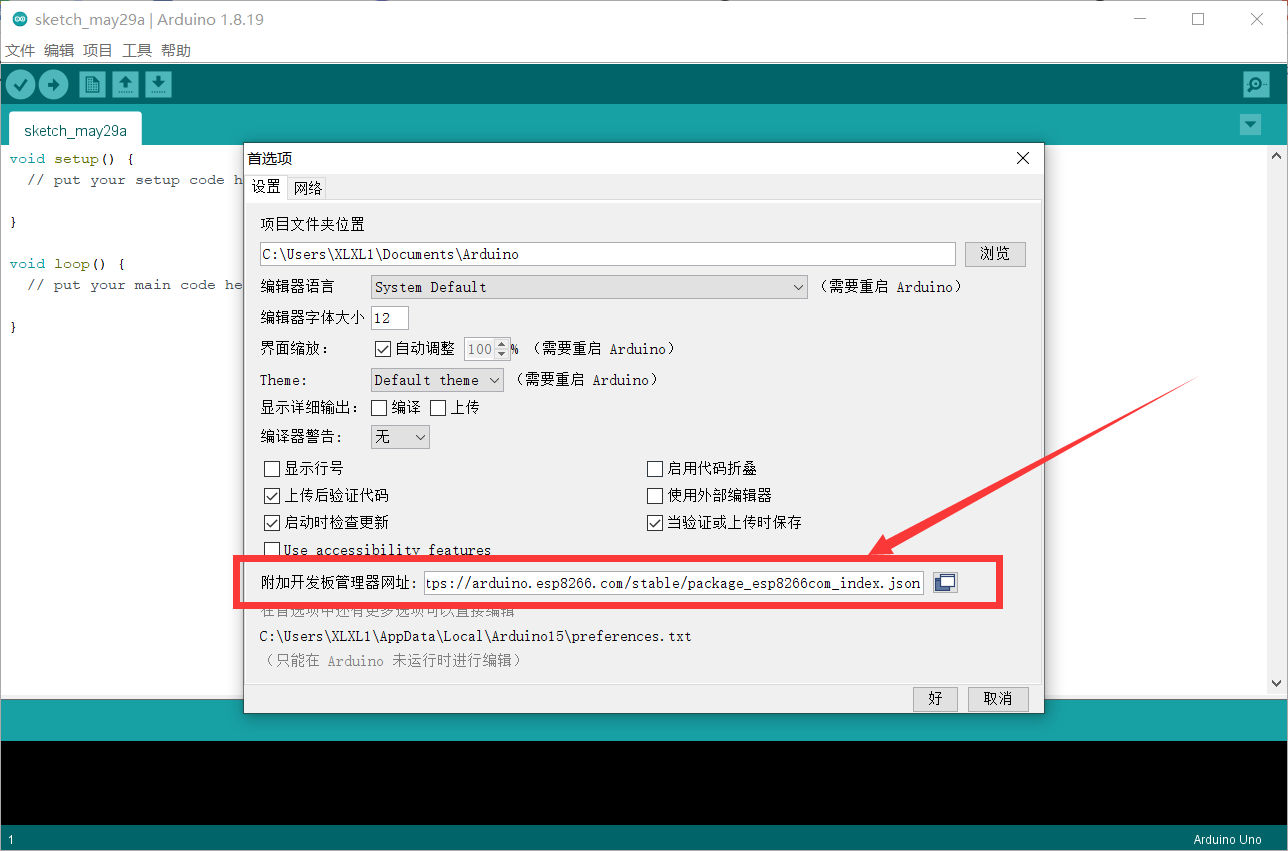
点击 好 来保存。
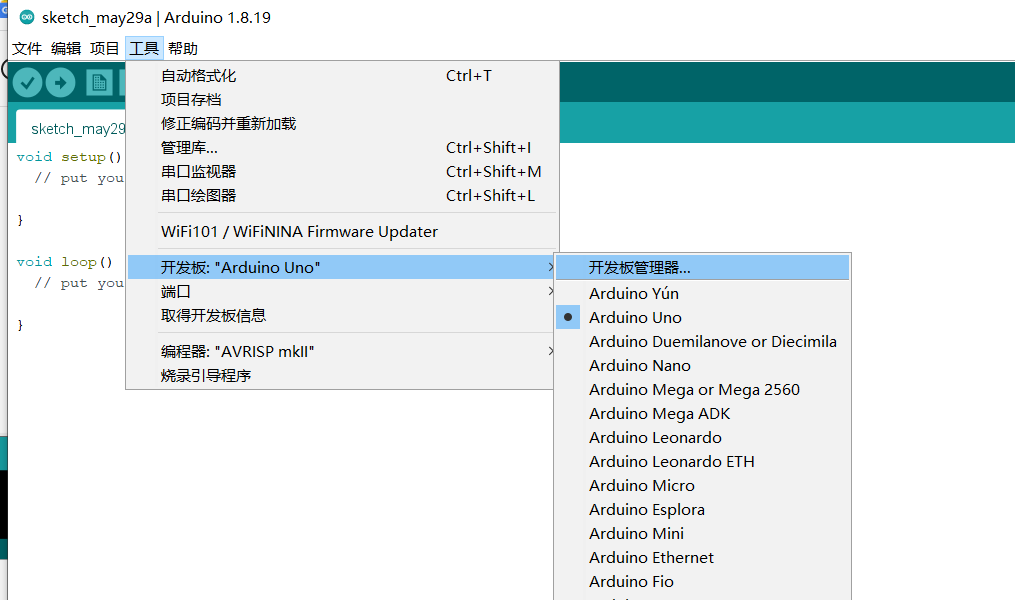
点击上边工具 – 开发板 – 开发板管理器
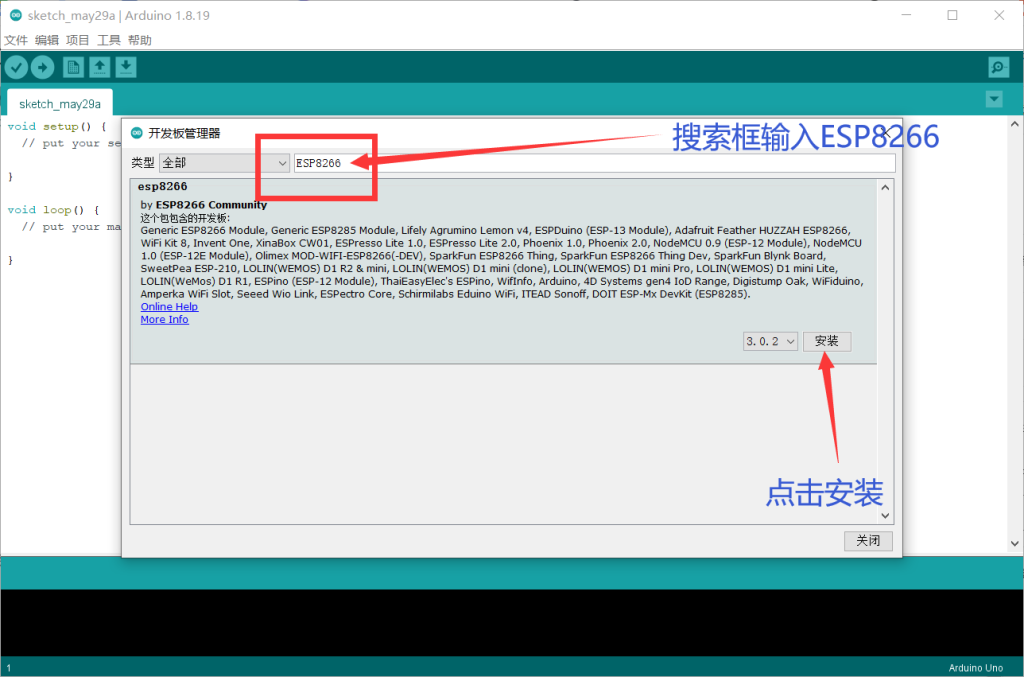
在搜索框中输入ESP8266,点击安装
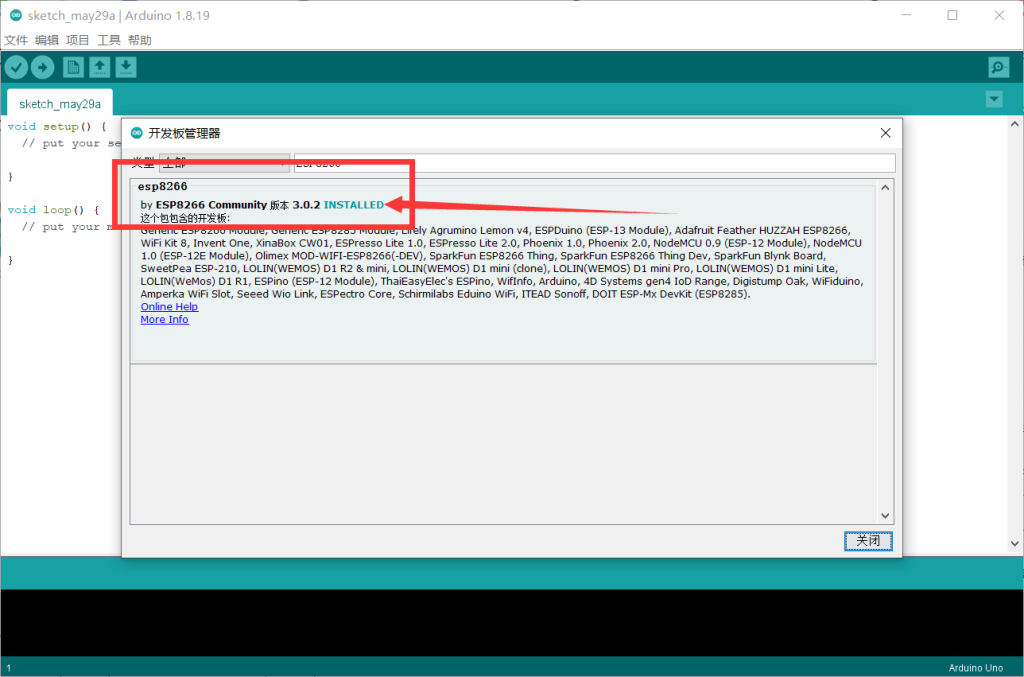
待版本号后出现INSTALLED即为安装成功
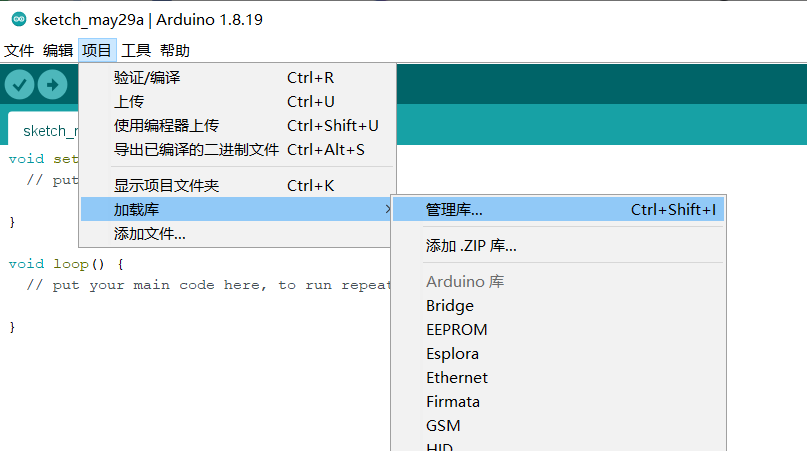
关掉该页面,点击上方项目 – 加载库 – 管理库,安装所需的库
搜索安装MQTT:

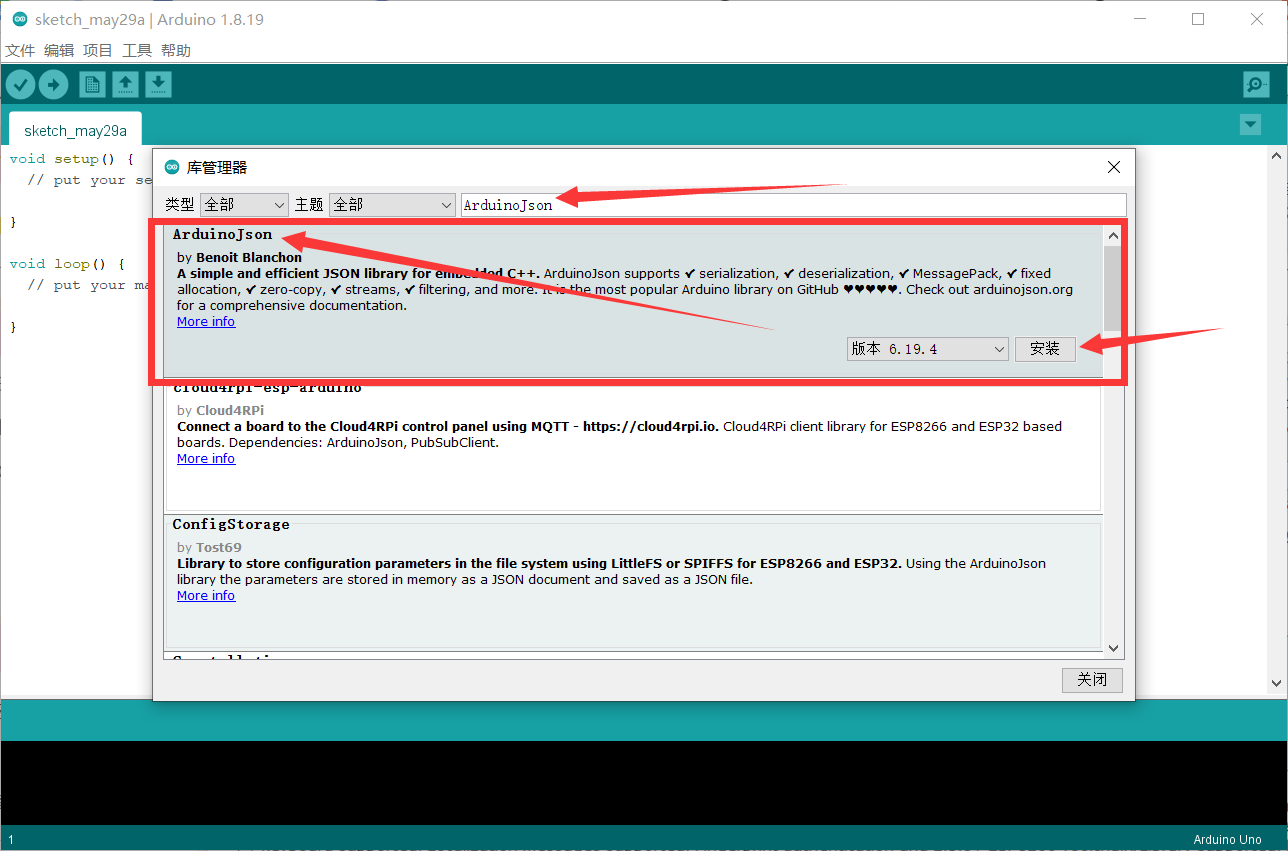
搜索安装ArduinoJson:
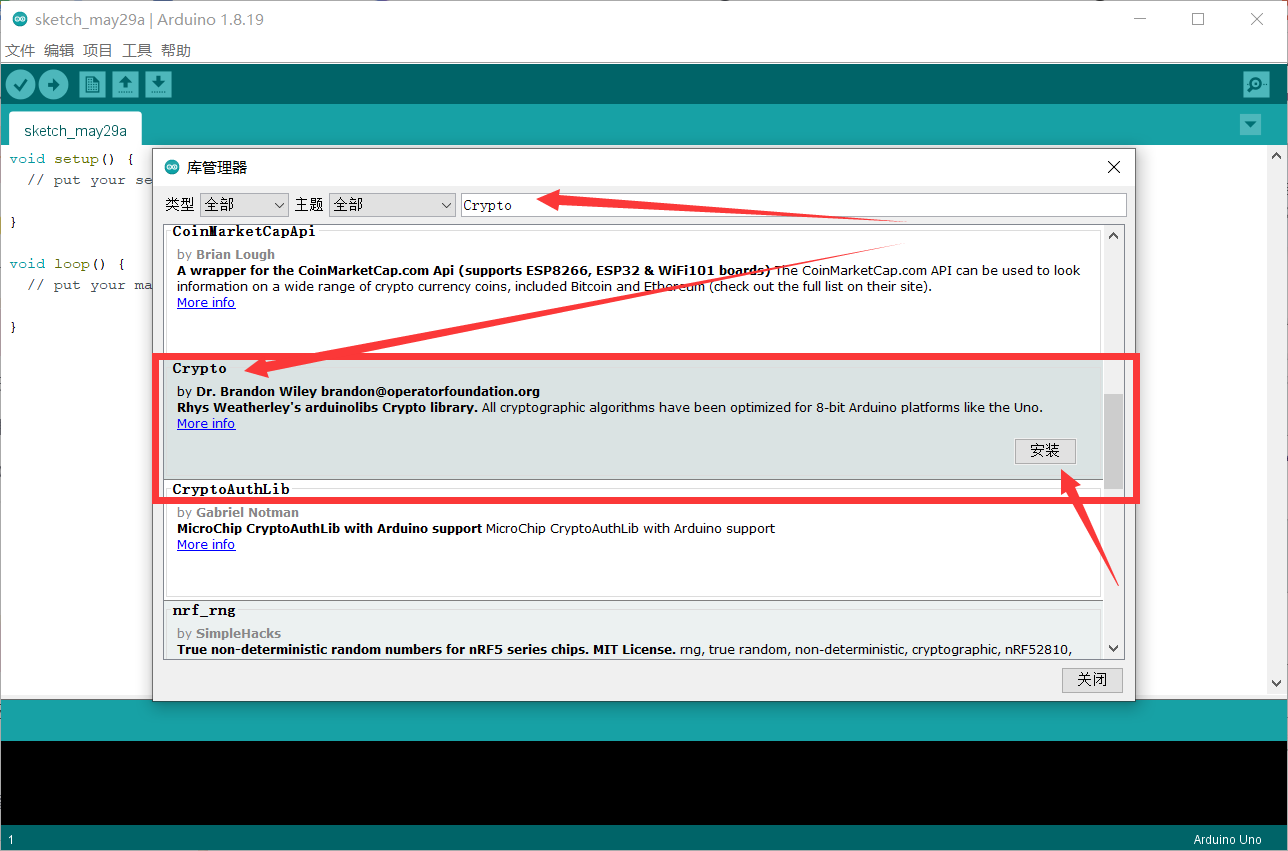
搜索安装Crypto:
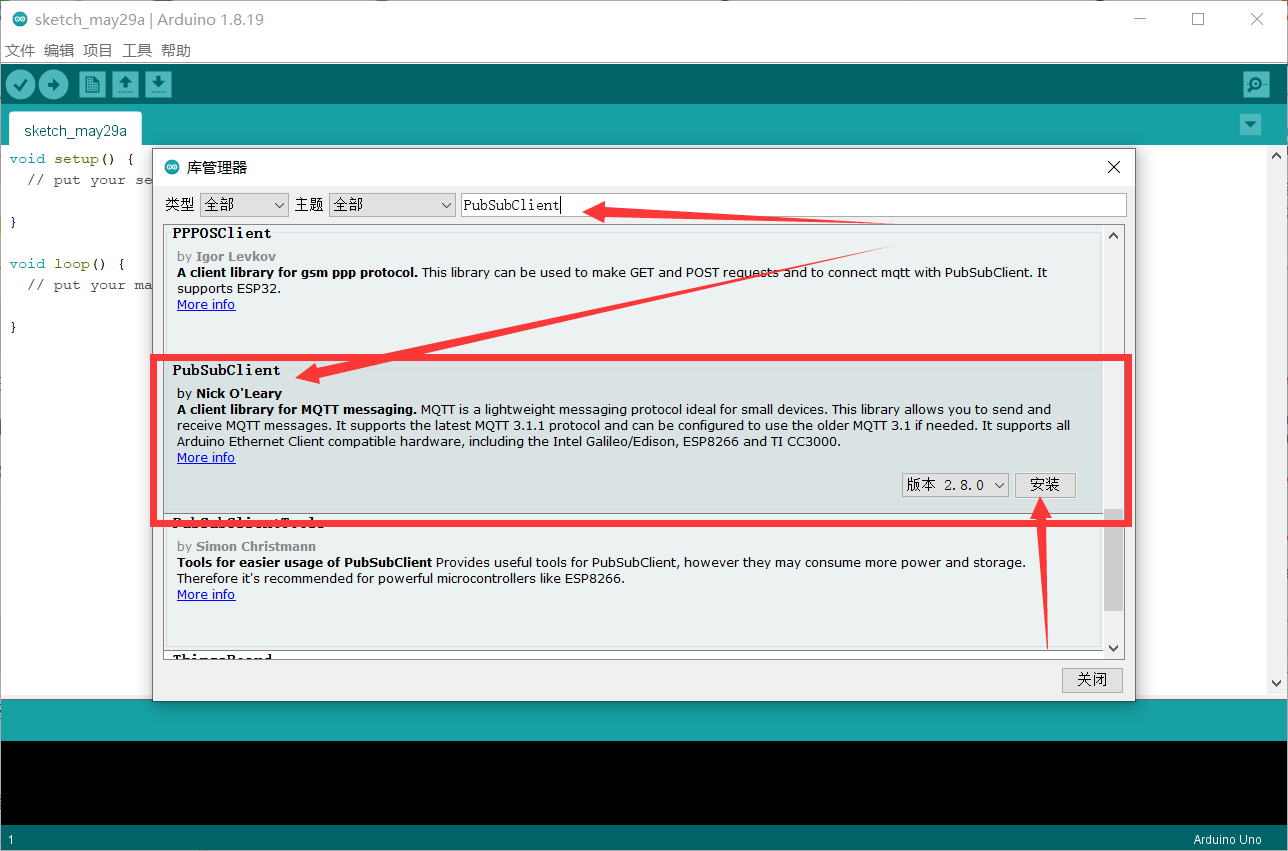
搜索安装PubSubClient:
实现功能
方案一
控制页面代码:
<!DOCTYPE html>
<html lang='zh'>

<head>
    <meta charset='UTF-8'>
    <meta name='viewport' content='width=device-width, initial-scale=1.0'>
    <link rel='Shortcut Icon' href='https://llyth.cn/favicon.ico'>
    <link rel='Bookmark' href='https://llyth.cn/favicon.ico'>
    <title>Eric`s Zone</title>
    <link rel='stylesheet' href='https://llyth.cn/index.css'>
    <script type='text/javascript' src='https://llyth.cn/jquery-2.2.4.min.js'></script>
</head>

<body>
    <div class='wrapper'></div>
    <div class='menu'><br><br><br><br><br>
        <header>
            <span class='favicon'><img src='https://llyth.cn/favicon.ico'></span>
            <h1 class='bt'>Eric·梦曦</h1>
            <div class='fgx'></div>
            <h3 class='bt'>☀我们都是追逐繁星的孩子☀</h3>
        </header>
        <section>
            <div>
                <a id='redButton' class='item' href='/D0/off' target='_blank'>
                    <span id='consoleRedStatus'>红灯:关</span>
                </a>
                <a id='greenButton' class='item' href='/D1/off' target='_blank'>
                    <span>绿灯:关</span>
                </a>
                <br>
                <a id='blueButton' class='item' href='D2/off'>
                    <span>蓝灯:关</span>
                </a>
                <a class='item' onclick='makeRandom()'>
                    <span>随机数</span>
                </a>
                <br>
                <a class='item' href='https://blog.llyth.cn/'>
                    <span>我的文章</span>
                </a>
                <a class='item' href='contact.html'>
                    <span>联系我</span>
                </a>
            </div>
        </section>
        <script>
            function makeRandom () {
                var randomNum=Math.random()*10;
                window.alert('随机数为:'+randomNum+',请自行选中复制!')}
        </script>
        <!--一言-->
        <script type='text/javascript'>
            $.get('https://v1.hitokoto.cn/',function(data,status){if(status=='success'){$('.hitokoto').text(data.hitokoto+'  -  '+data.from)}else{$('.hitokoto').text('获取出错!')}});
        </script>
        <div class='hitokoto' id="yy" onclick='javascript:location.reload();'></div>
        <!--一言-->
    </div>
    <div class='tj'>
        <div class='doudong'>(●・◡・●)ノ♥</div><br>Copyright ©2020-2022 <a href='https://llyth.cn/contact.html' style='color: white;'>Mr.Liang</a> All Rights Reserved.<br><a href='https://beian.miit.gov.cn/#/Integrated/index' target='_blank' style='color: white;'>吉ICP备2021004433号-2</a><br>
    </div>
</body>

</html>
ESP8266代码(完整代码):
#include <ESP8266WiFi.h>

// Enter your wifi network name and Wifi Password
const char* ssid = "iPhone 13 Pro Max";
const char* password = "123456789";

// Set web server port number to 80
WiFiServer server(80);

// Variable to store the HTTP request
String header;

// These variables store current output state of LED
String outputRedState = "关";
String outputGreenState = "关";
String outputBlueState = "关";
String outputStatusLedState = "关";

String consoleRedAddr = "/D0/off";
String consoleGreenAddr = "/D1/off";
String consoleBlueAddr = "/D2/off";
String consoleStatusLedAddr = "/LED_BUILTIN/off";
// Assign output variables to GPIO pins
const int redLED = D0;
const int greenLED = D1;
const int blueLED = D2;
const int statusLED = LED_BUILTIN;

// Current time
unsigned long currentTime = millis();
// Previous time
unsigned long previousTime = 0;
// Define timeout time in milliseconds (example: 2000ms = 2s)
const long timeoutTime = 2000;

void setup() {
  Serial.begin(115200);
  // Initialize the output variables as outputs
  pinMode(redLED, OUTPUT);
  pinMode(greenLED, OUTPUT);
  pinMode(blueLED, OUTPUT);
  pinMode(LED_BUILTIN, OUTPUT);
  // Set outputs to LOW
  digitalWrite(redLED, LOW);
  digitalWrite(greenLED, LOW);
  digitalWrite(blueLED, LOW);
  digitalWrite(LED_BUILTIN, HIGH);

  // Connect to Wi-Fi network with SSID and password
  Serial.print("Connecting to ");
  Serial.println(ssid);
  WiFi.begin(ssid, password);
  while (WiFi.status() != WL_CONNECTED) {
    delay(500);
    Serial.print(".");
  }
  // Print local IP address and start web server
  Serial.println("");
  Serial.println("WiFi connected.");
  Serial.println("IP address: ");
  Serial.println(WiFi.localIP());
  server.begin();
}

void loop() {
  WiFiClient client = server.available(); // Listen for incoming clients

  if (client) { // If a new client connects,
    Serial.println("New Client."); // print a message out in the serial port
    String currentLine = ""; // make a String to hold incoming data from the client
    currentTime = millis();
    previousTime = currentTime;
    while (client.connected() && currentTime - previousTime <= timeoutTime) { // loop while the client's connected
      currentTime = millis();
      if (client.available()) { // if there's bytes to read from the client,
        char c = client.read(); // read a byte, then
        Serial.write(c); // print it out the serial monitor
        header += c;
        if (c == '\n') { // if the byte is a newline character
          // if the current line is blank, you got two newline characters in a row.
          // that's the end of the client HTTP request, so send a response:
          if (currentLine.length() == 0) {
            // HTTP headers always start with a response code (e.g. HTTP/1.1 200 OK)
            // and a content-type so the client knows what's coming, then a blank line:
            client.println("HTTP/1.1 200 OK");
            client.println("Content-type:text/html");
            client.println("Connection: close");
            client.println();

            // turns the GPIOs on and off
            if (header.indexOf("GET /D0/on") >= 0) {
              Serial.println("RED LED is on");
              outputRedState = "开";
              digitalWrite(redLED, HIGH);
            } else if (header.indexOf("GET /D0/off") >= 0) {
              Serial.println("RED LED is off");
              outputRedState = "关";
              digitalWrite(redLED, LOW);
            } else if (header.indexOf("GET /D1/on") >= 0) {
              Serial.println("Green LED is on");
              outputGreenState = "开";
              digitalWrite(greenLED, HIGH);
            } else if (header.indexOf("GET /D1/off") >= 0) {
              Serial.println("Green LED is off");
              outputGreenState = "关";
              digitalWrite(greenLED, LOW);
            } else if (header.indexOf("GET /D2/on") >= 0) {
              Serial.println("Blue LED is on");
              outputBlueState = "开";
              digitalWrite(blueLED, HIGH);
            } else if (header.indexOf("GET /D2/off") >= 0) {
              Serial.println("Blue LED is off");
              outputBlueState = "关";
              digitalWrite(blueLED, LOW);
            } else if (header.indexOf("GET /LED_BUILTIN/on") >= 0) {
              Serial.println("LED_BUILTIN LED is on");
              outputStatusLedState = "开";
              digitalWrite(LED_BUILTIN, LOW);
            } else if (header.indexOf("GET /LED_BUILTIN/off") >= 0) {
              Serial.println("LED_BUILTIN LED is off");
              outputStatusLedState = "关";
              digitalWrite(LED_BUILTIN, HIGH);
            }

            if (outputRedState == "关") {
              consoleRedAddr = "/D0/on";
            } else {
              consoleRedAddr = "/D0/off";
            }

            if (outputGreenState == "关") {
              consoleGreenAddr = "/D1/on";
            } else {
              consoleGreenAddr = "/D1/off";
            }

            if (outputBlueState == "关") {
              consoleBlueAddr = "/D2/on";
            } else {
              consoleBlueAddr = "/D2/off";
            }

            if (outputStatusLedState == "关") {
              consoleStatusLedAddr = "/LED_BUILTIN/on";
            } else {
              consoleStatusLedAddr = "/LED_BUILTIN/off";
            }


            // Display the HTML web page
            client.println("<!DOCTYPE html><html lang='zh'><head><meta charset='UTF-8'><meta name='viewport'content='width=device-width, initial-scale=1.0'><link rel='Shortcut Icon'href='https://llyth.cn/favicon.ico'><link rel='Bookmark'href='https://llyth.cn/favicon.ico'><title>Eric`s Zone</title><link rel='stylesheet'href='https://llyth.cn/index.css'><script type='text/javascript'src='https://llyth.cn/jquery-2.2.4.min.js'></script></head><body><div class='wrapper'></div><div class='menu'><br><br><br><br><br><header><span class='favicon'><img src='https://llyth.cn/favicon.ico'></span><h1 class='bt'>Eric·梦曦</a></h1><div class='fgx'></div><h3 class='bt'>☀我们都是追逐繁星的孩子☀</h3></header><section><div><a id='redButton'class='item'href=" + consoleRedAddr + "><span id='consoleRedStatus'>红灯:" + outputRedState + "</span></a><a id='greenButton'class='item'href=" + consoleGreenAddr + "><span>绿灯:" + outputGreenState + "</span></a><br><a id='blueButton'class='item'href=" + consoleBlueAddr + "><span>蓝灯:" + outputBlueState + "</span></a><a class='item'href=" + consoleStatusLedAddr + "><span>板载LED:" + outputStatusLedState + "</span></a><br><a class='item' style='cursor:pointer;'onclick='makeRandom();'><span>随机数生成</span></a><a class='item'href='https://blog.llyth.cn'target='_blank'><span>我的文章</span></a></div></section><script>function makeRandom(){var randomNum=Math.random()*10;window.alert('随机数为:'+randomNum+',请自行选中复制!')}</script><!--一言--><script type='text/javascript'>$.get('https://v1.hitokoto.cn/',function(data,status){if(status=='success'){$('.hitokoto').text(data.hitokoto+'  -  '+data.from)}else{$('.hitokoto').text('获取出错!')}});</script><div class='hitokoto'id='yy'onclick='javascript:location.reload();'></div><!--一言--></div><div class='tj'><div class='doudong'>(●・◡・●)ノ♥</div><br>Copyright ©2020-2022 <a href='https://llyth.cn/contact.html'style='color: white;'>Mr.Liang</a> All Rights Reserved.<br><a href='https://beian.miit.gov.cn/#/Integrated/index'target='_blank'style='color: white;'>吉ICP备2021004433号-2</a><br></div></body></html>");

            // The HTTP response ends with another blank line
            client.println();
            // Break out of the while loop
            break;
          } else { // if you got a newline, then clear currentLine
            currentLine = "";
          }
        } else if (c != '\r') { // if you got anything else but a carriage return character,
          currentLine += c; // add it to the end of the currentLine
        }
      }
    }
    // Clear the header variable
    header = "";
    // Close the connection
    client.stop();
    Serial.println("Client disconnected.");
    Serial.println("");
  }
}
注:粘贴时需要将代码第4行的值改为自己的WiFi名称、将代码第5行改为自己的WiFi密码
将上述代码粘入Arduino中,点击左上角的上传即可将代码编译并烧录进板子中(如果对代码正确性不能完全保证的话可以先点击左边的验证查看是否有报错)
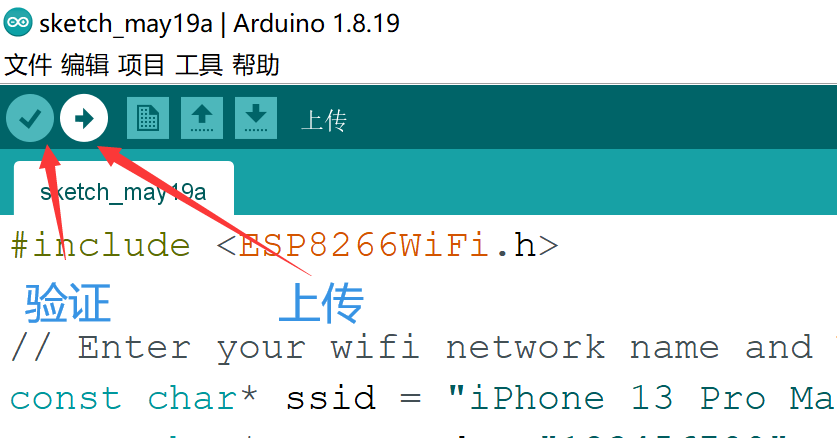
点击上传后,左下角会有“正在编译项目…”的提示,右下角有对应的进度
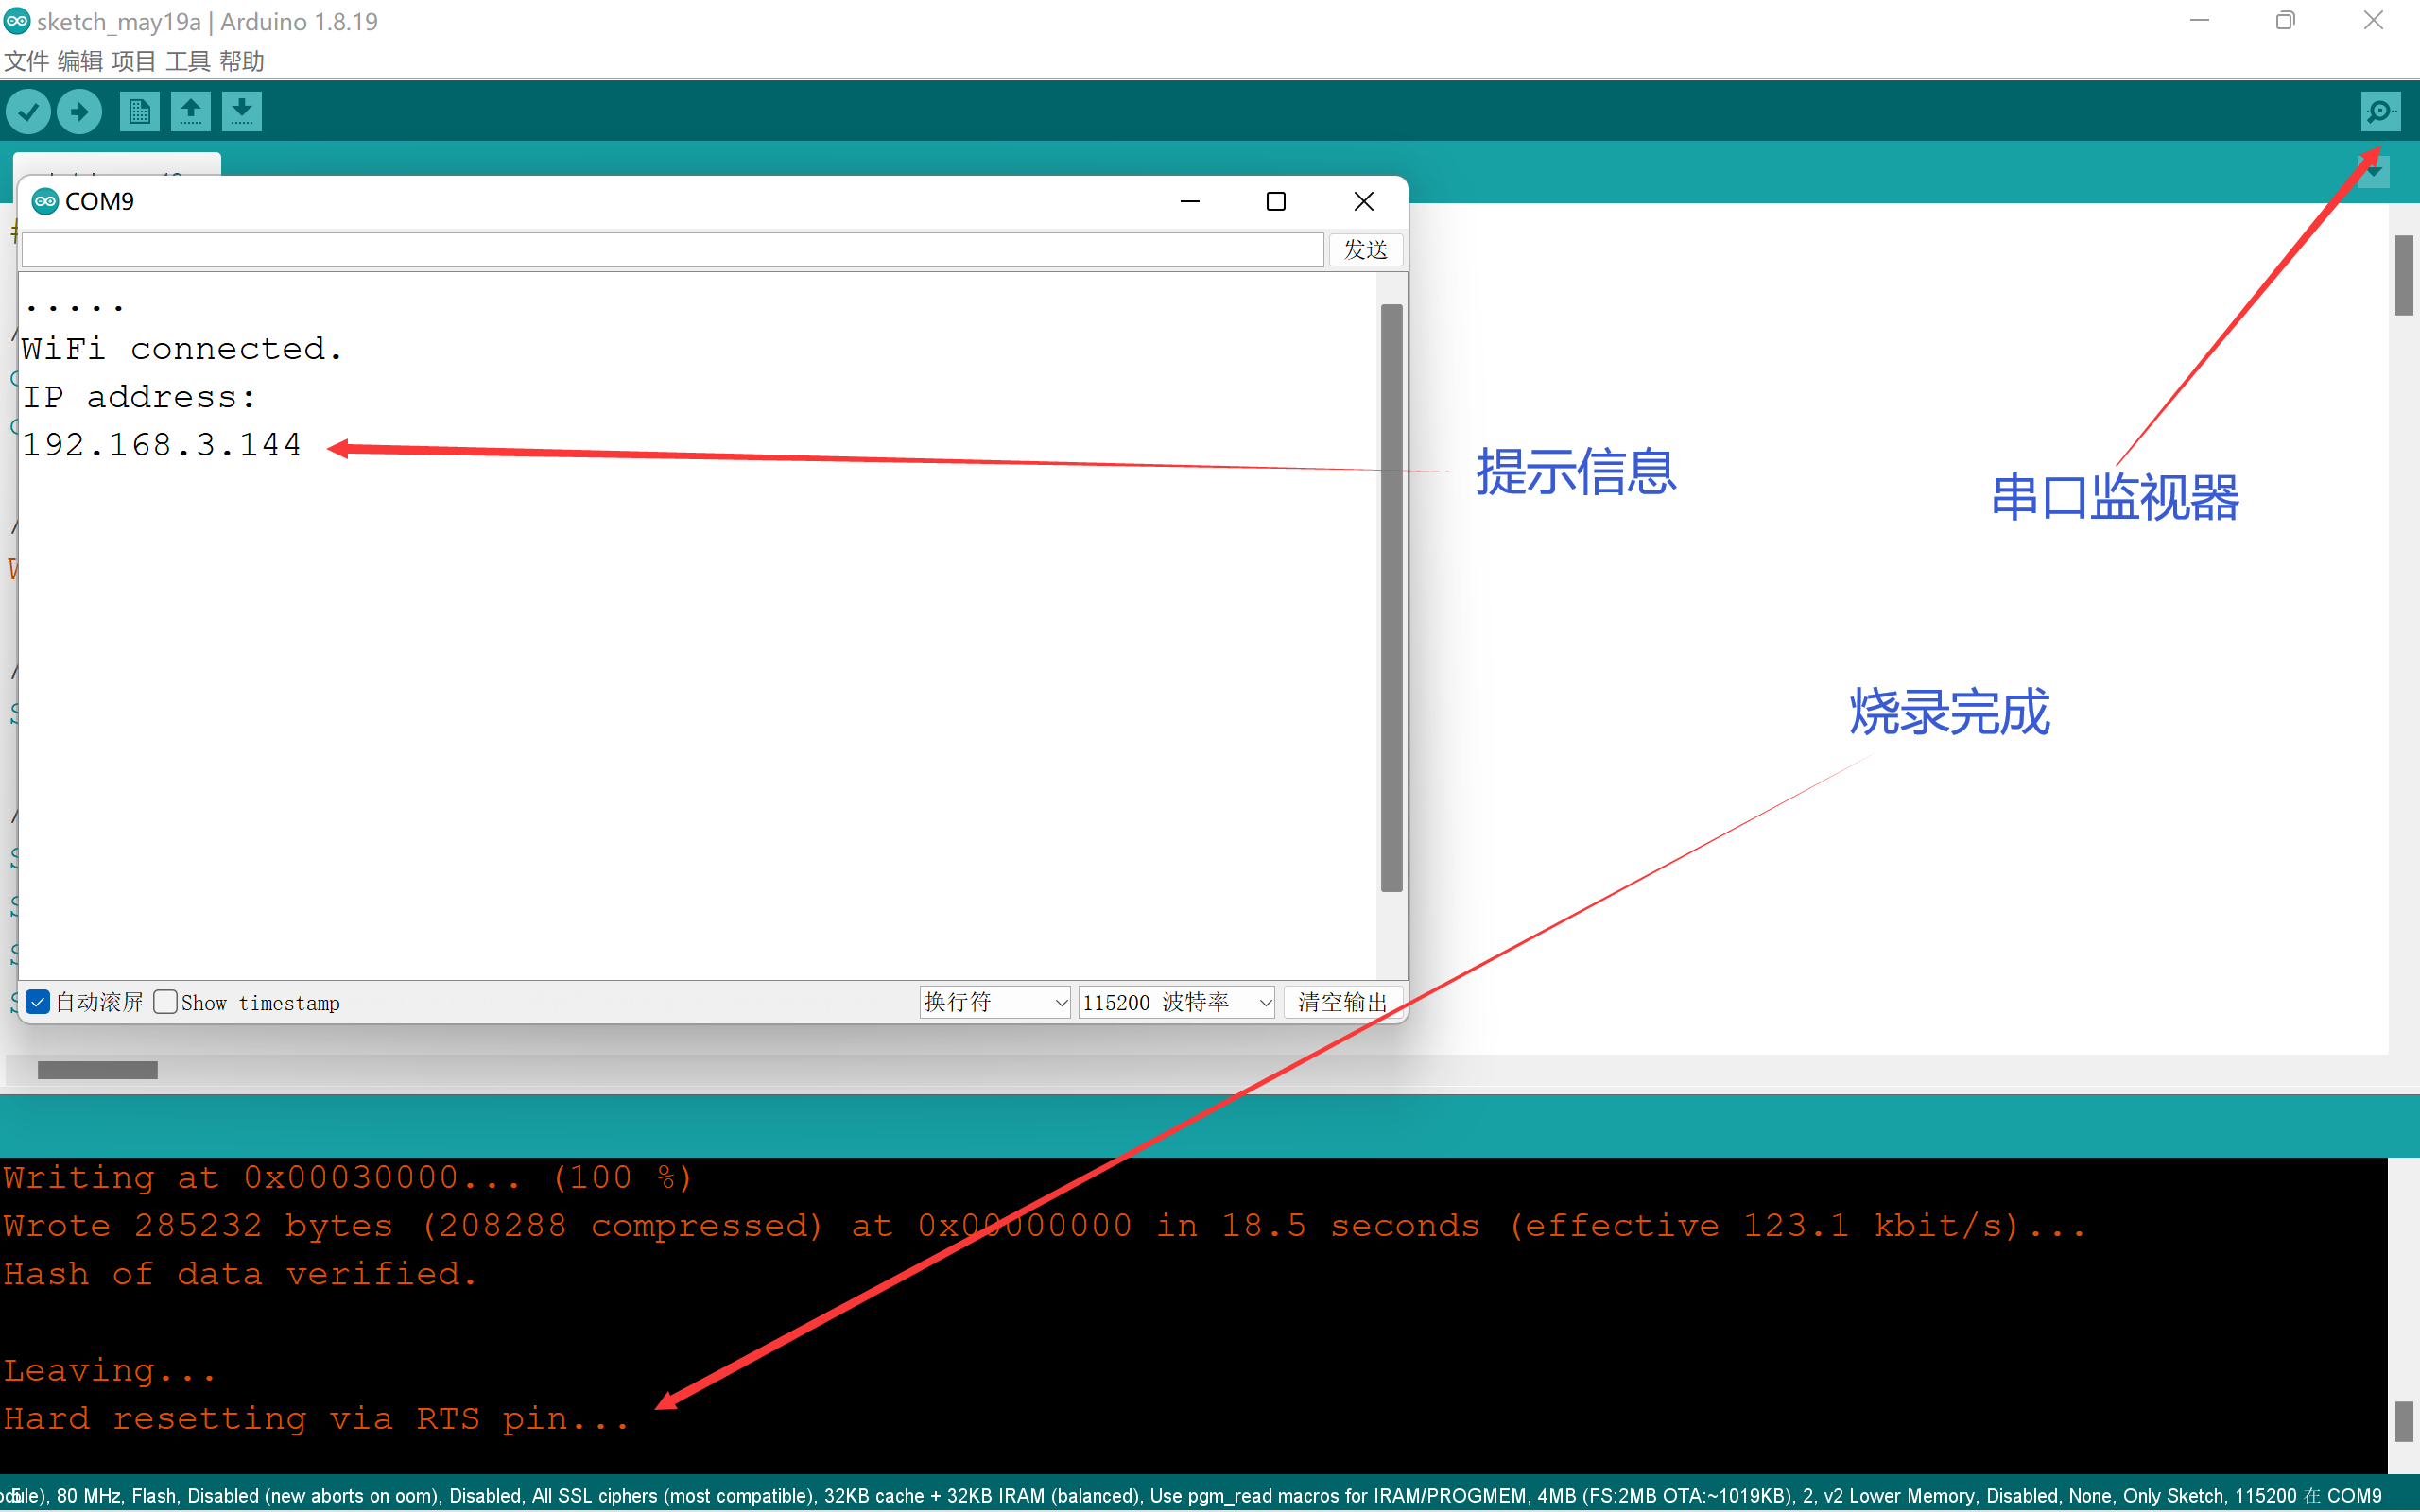
编译完成没有错误之后,Arduino会开始烧录,此时左下角提示变为“上传”,下面会有红色百分比文字刷新,此时不要点击左上角的串口监视器,会直接打断上传操作!!!
烧录完成后左下角提示变为常驻的Hard resetting via RTS pin…,此时打开串口监视器可以看到输出的当前ESP8266在局域网中的IP地址(如果没有可以按一下开发板上的RST按钮来重启开发板)
将IP地址用浏览器打开即可访问控制页面

方案二
搭建EMQX
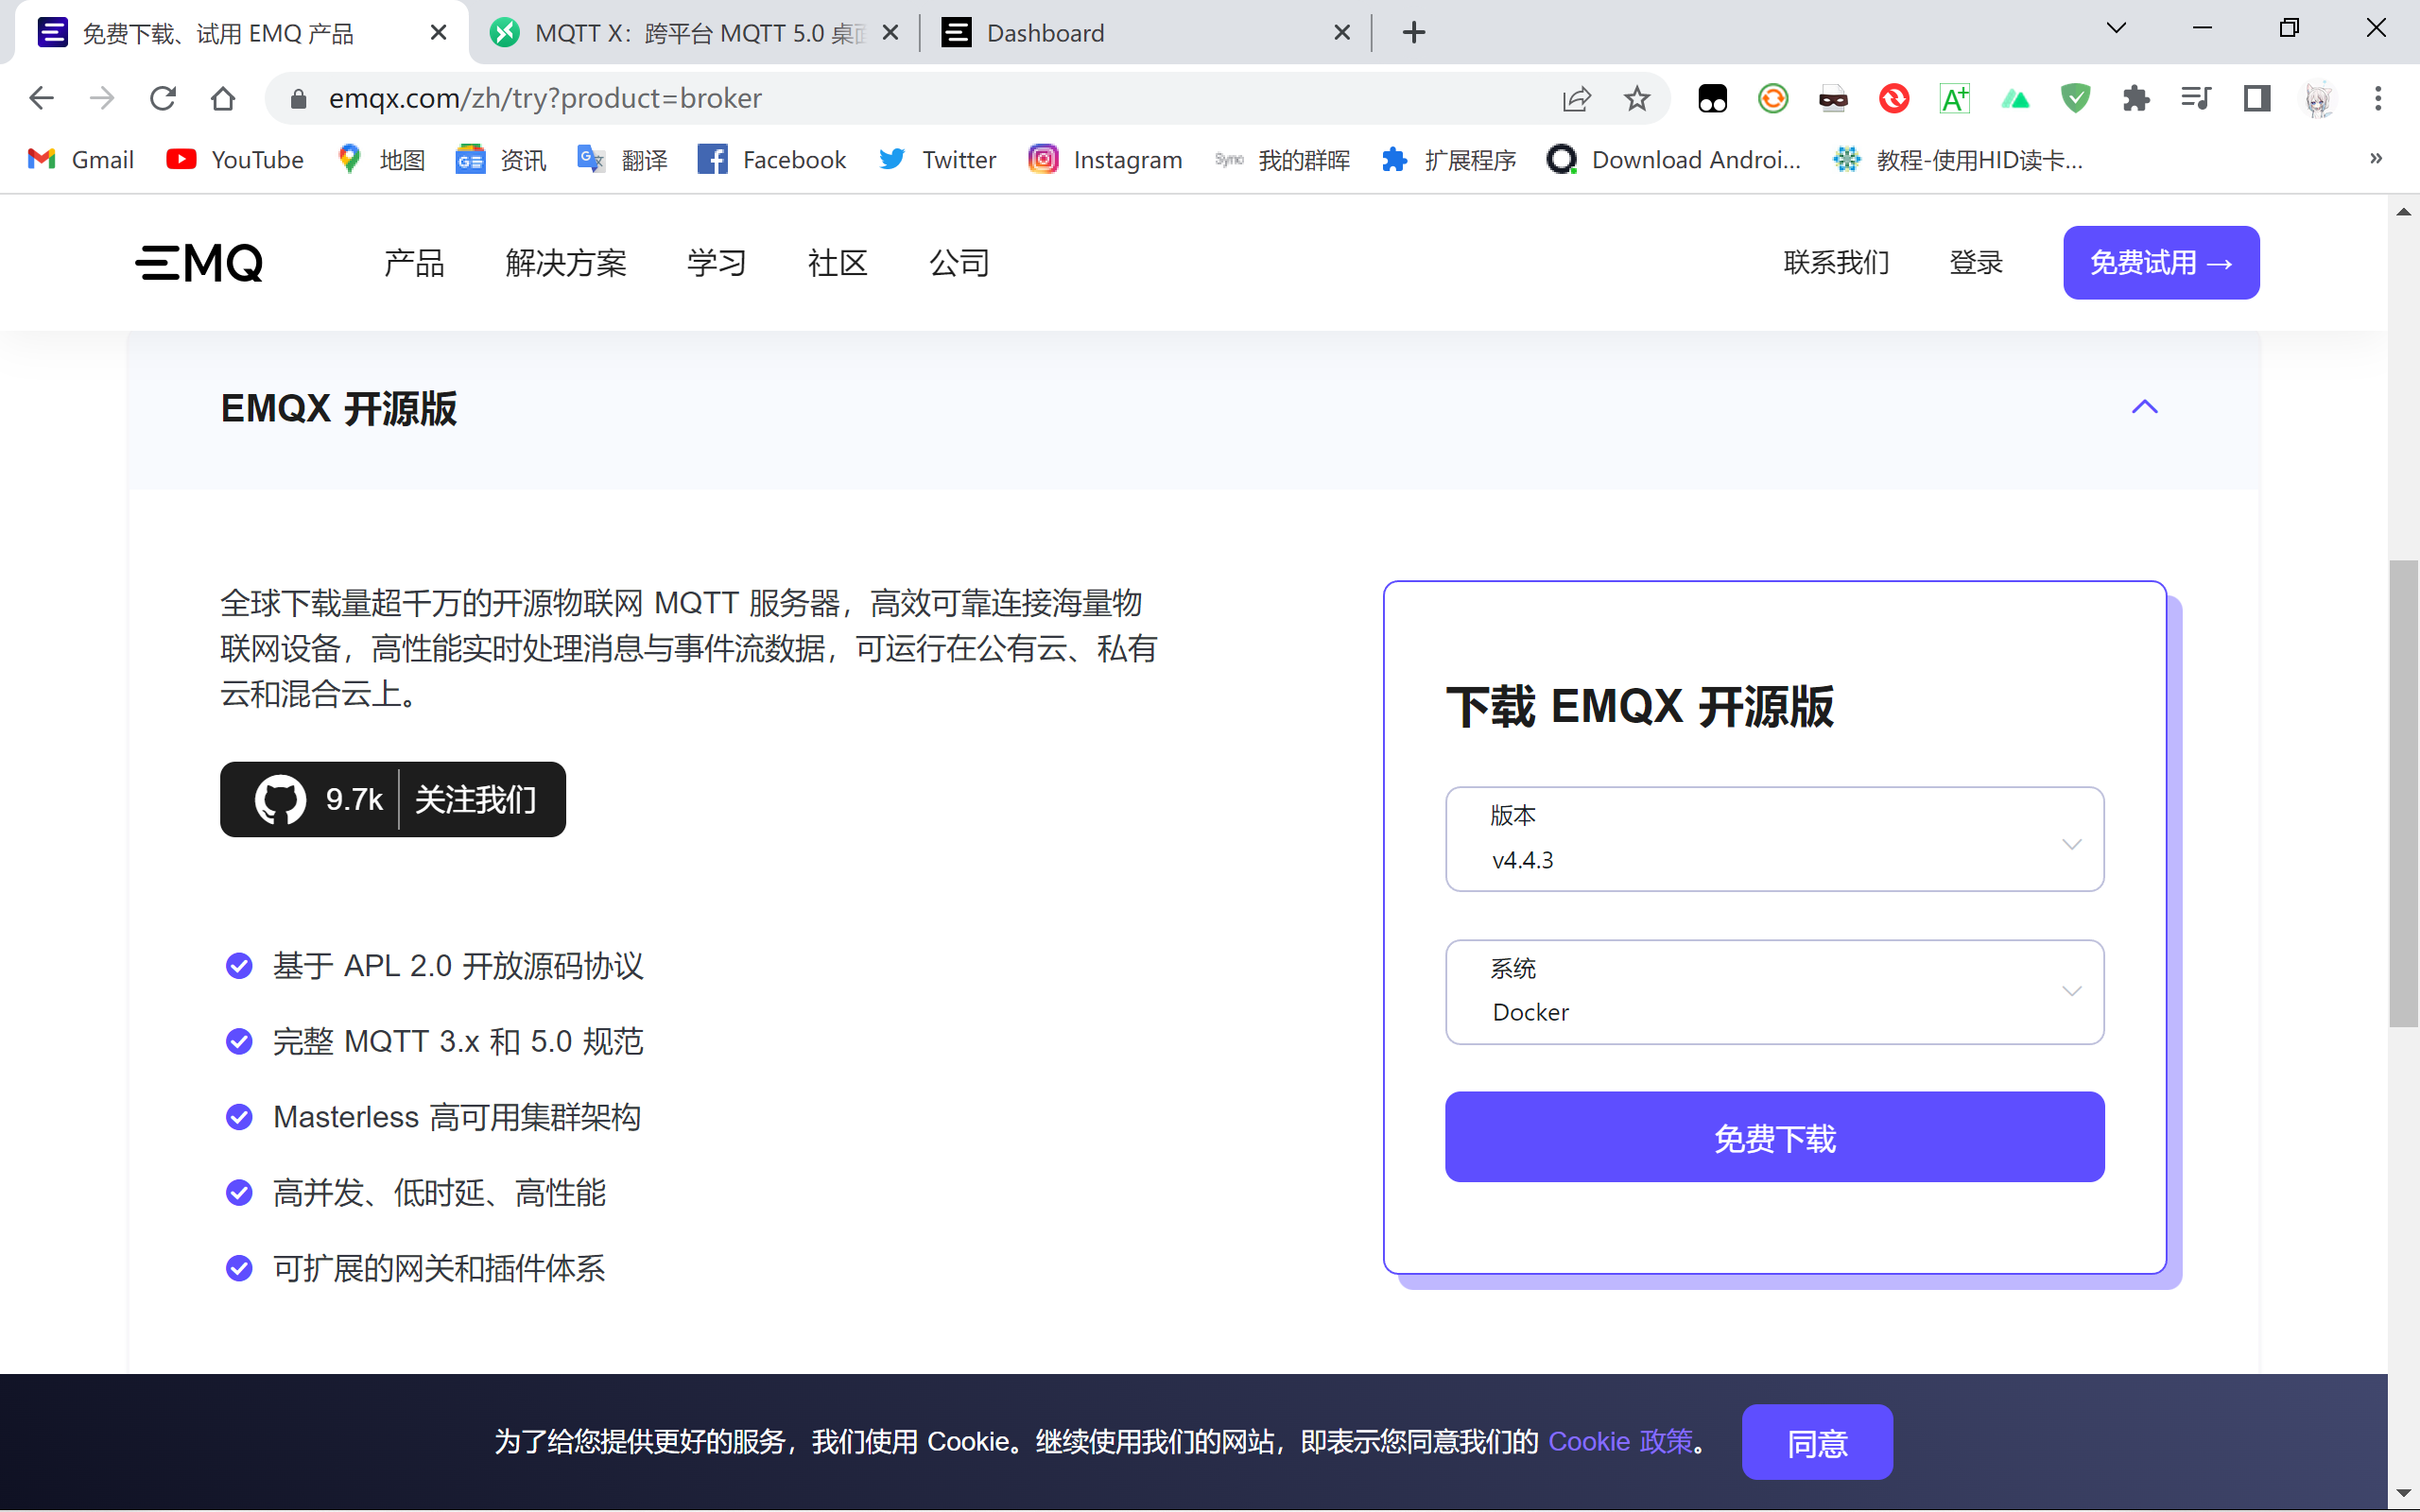
使用云服务器搭建EMQX服务(推荐使用Docker搭建以防止出现奇奇怪怪的错误)
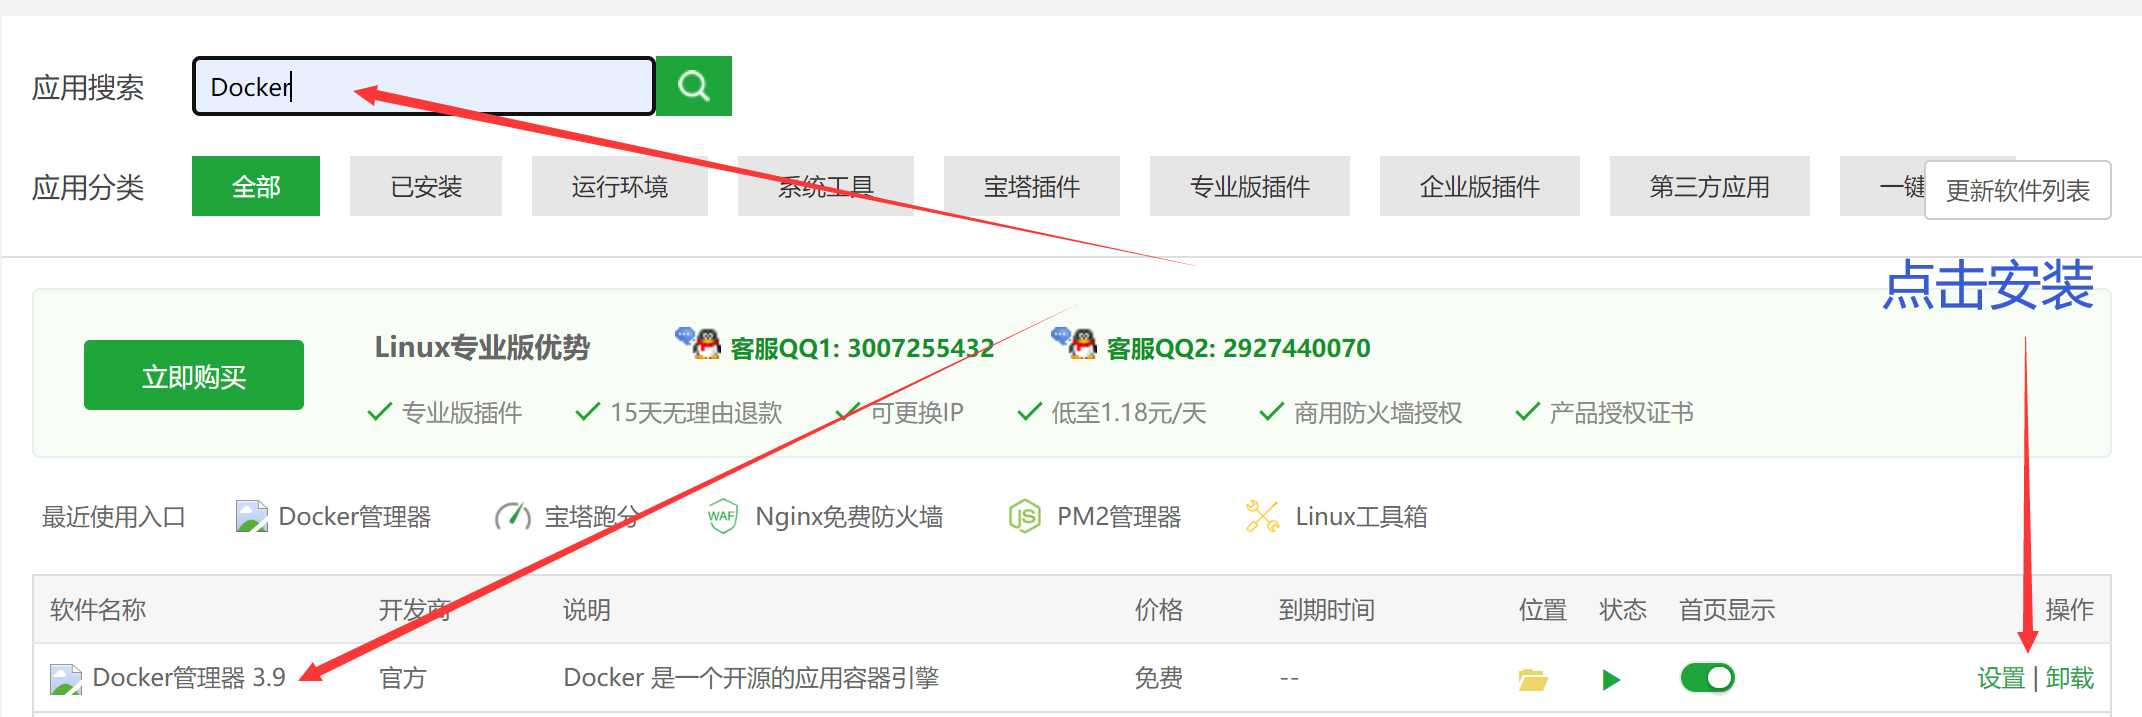
(此处以宝塔面板为例)
下载Docker管理器
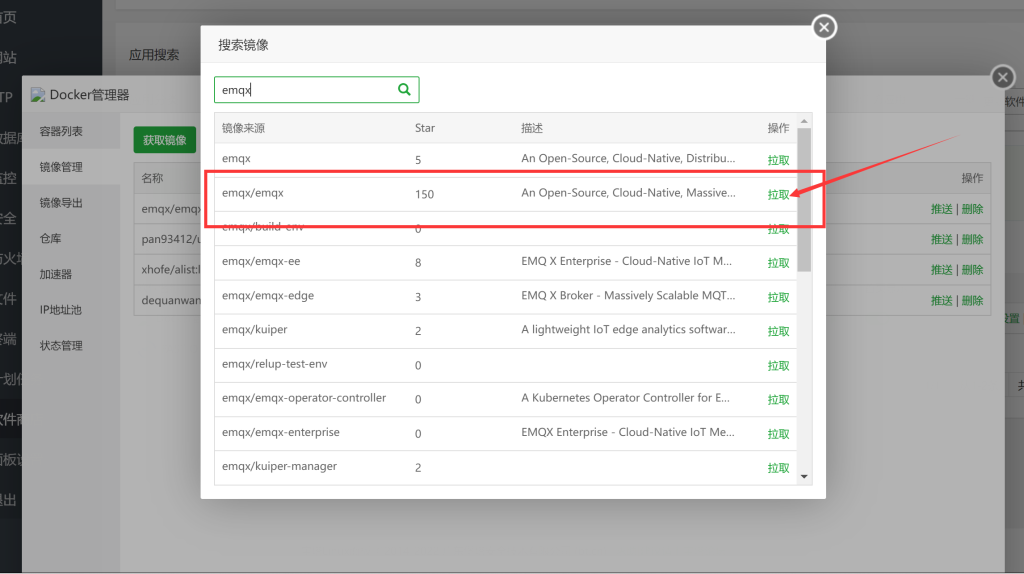
点击设置,点击镜像管理 – 镜像搜索 – 输入关键词emqx,点击拉取
点击容器列表 – 创建容器,参照下图绑定端口:
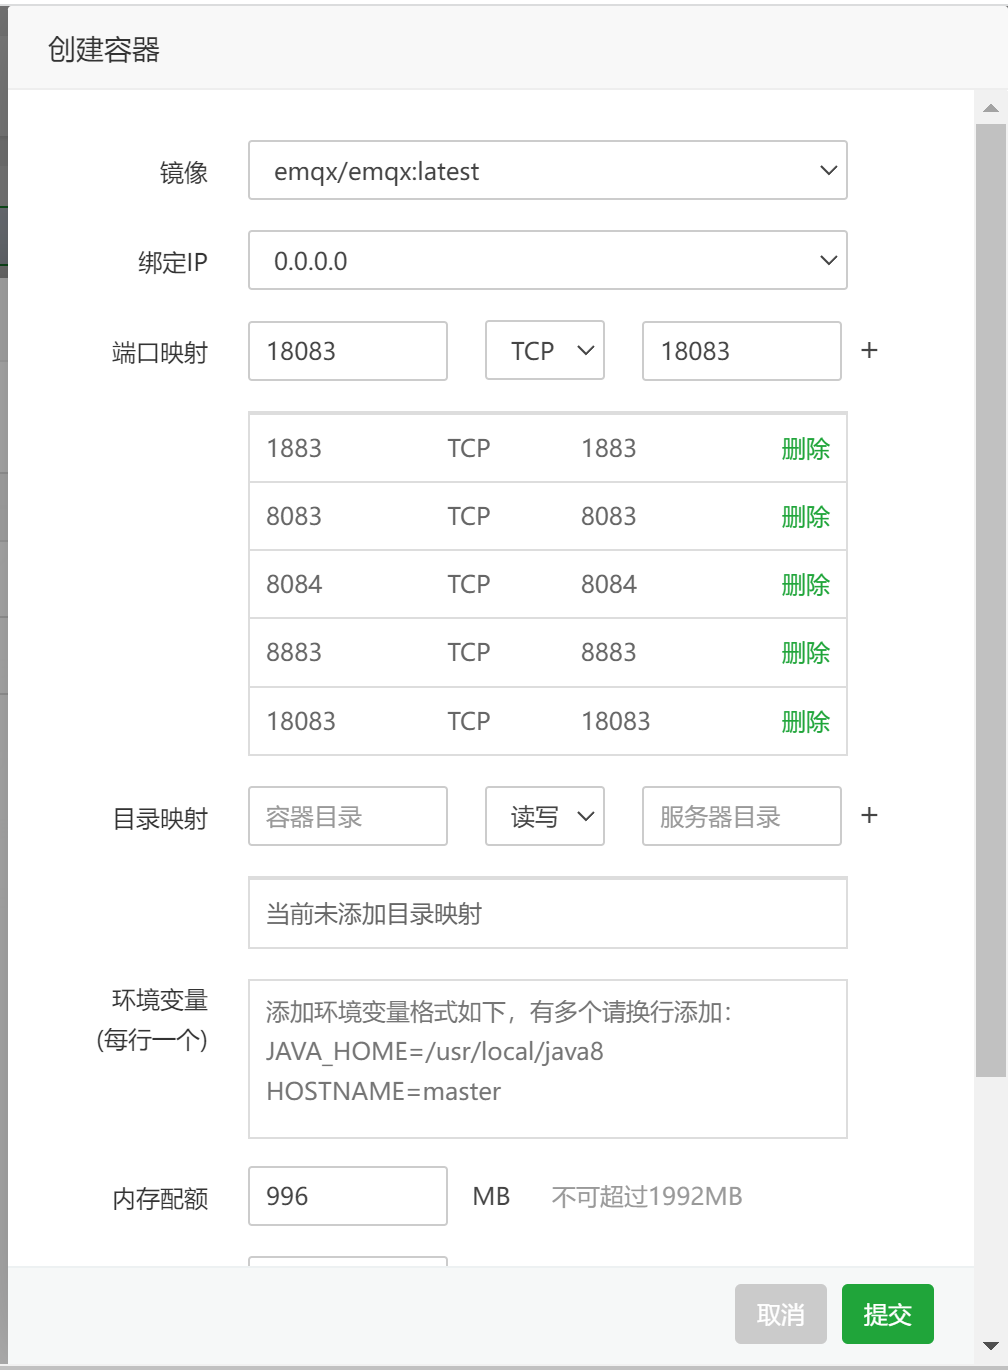
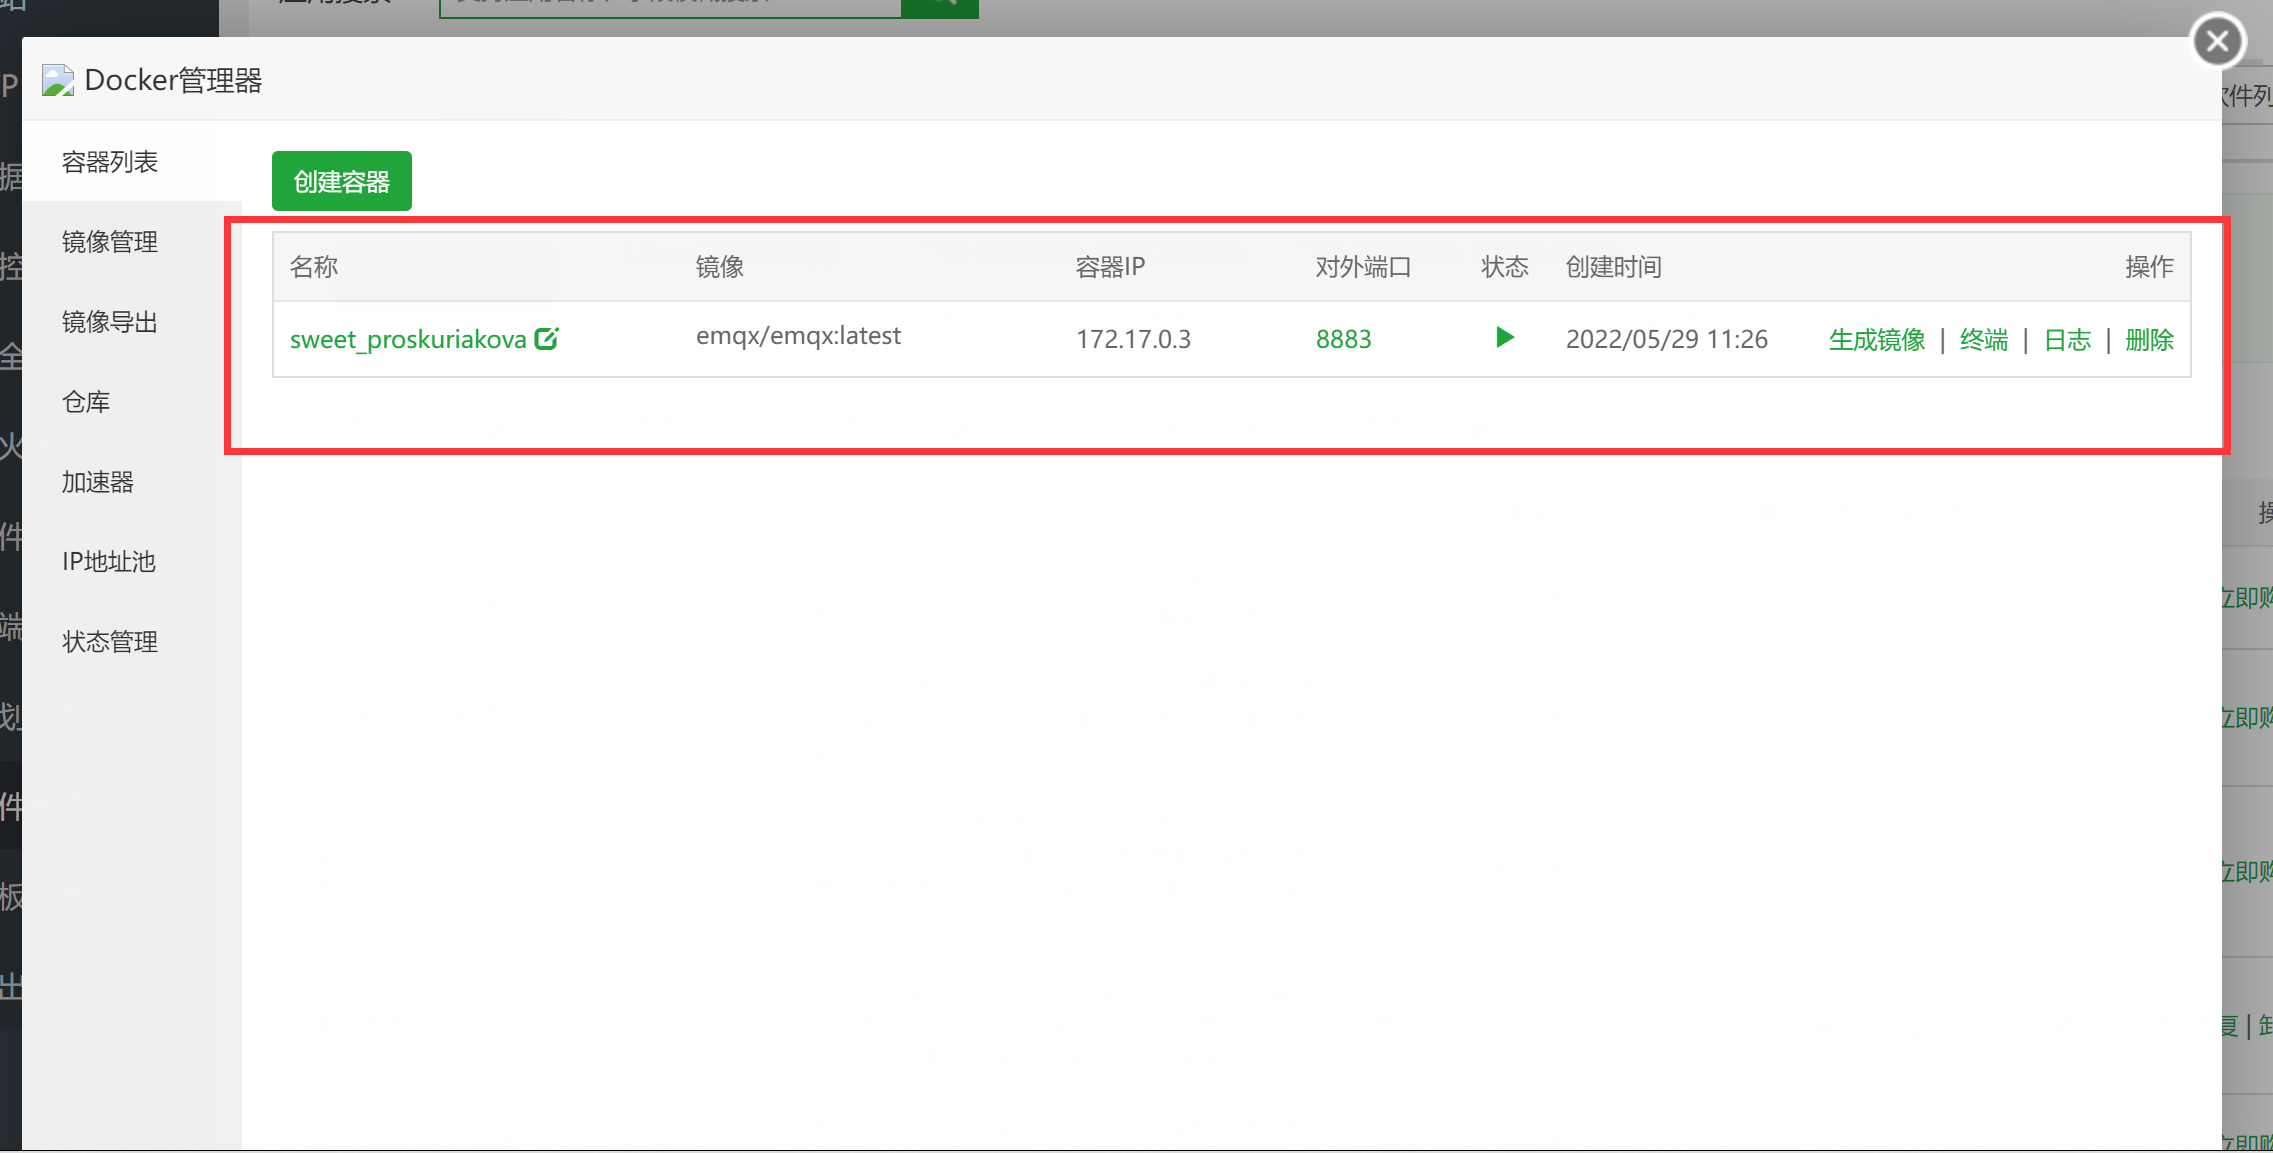
填好后点击提交按钮,稍事休息,Docker管理器将自动创建容器并开始运行
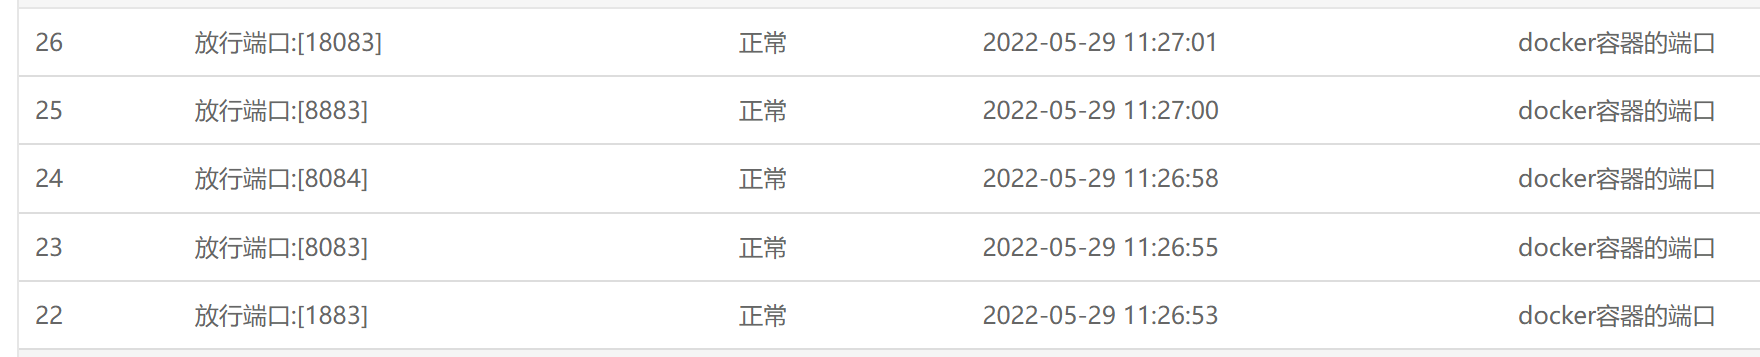
注:需要去服务器运营商控制台放行以下端口以确保设备能与EMQX服务端正常通信(如您是宝塔面板用户,宝塔面板会自动帮您放行宝塔面板 – 安全中的端口,无需手动放行)
创建Topic
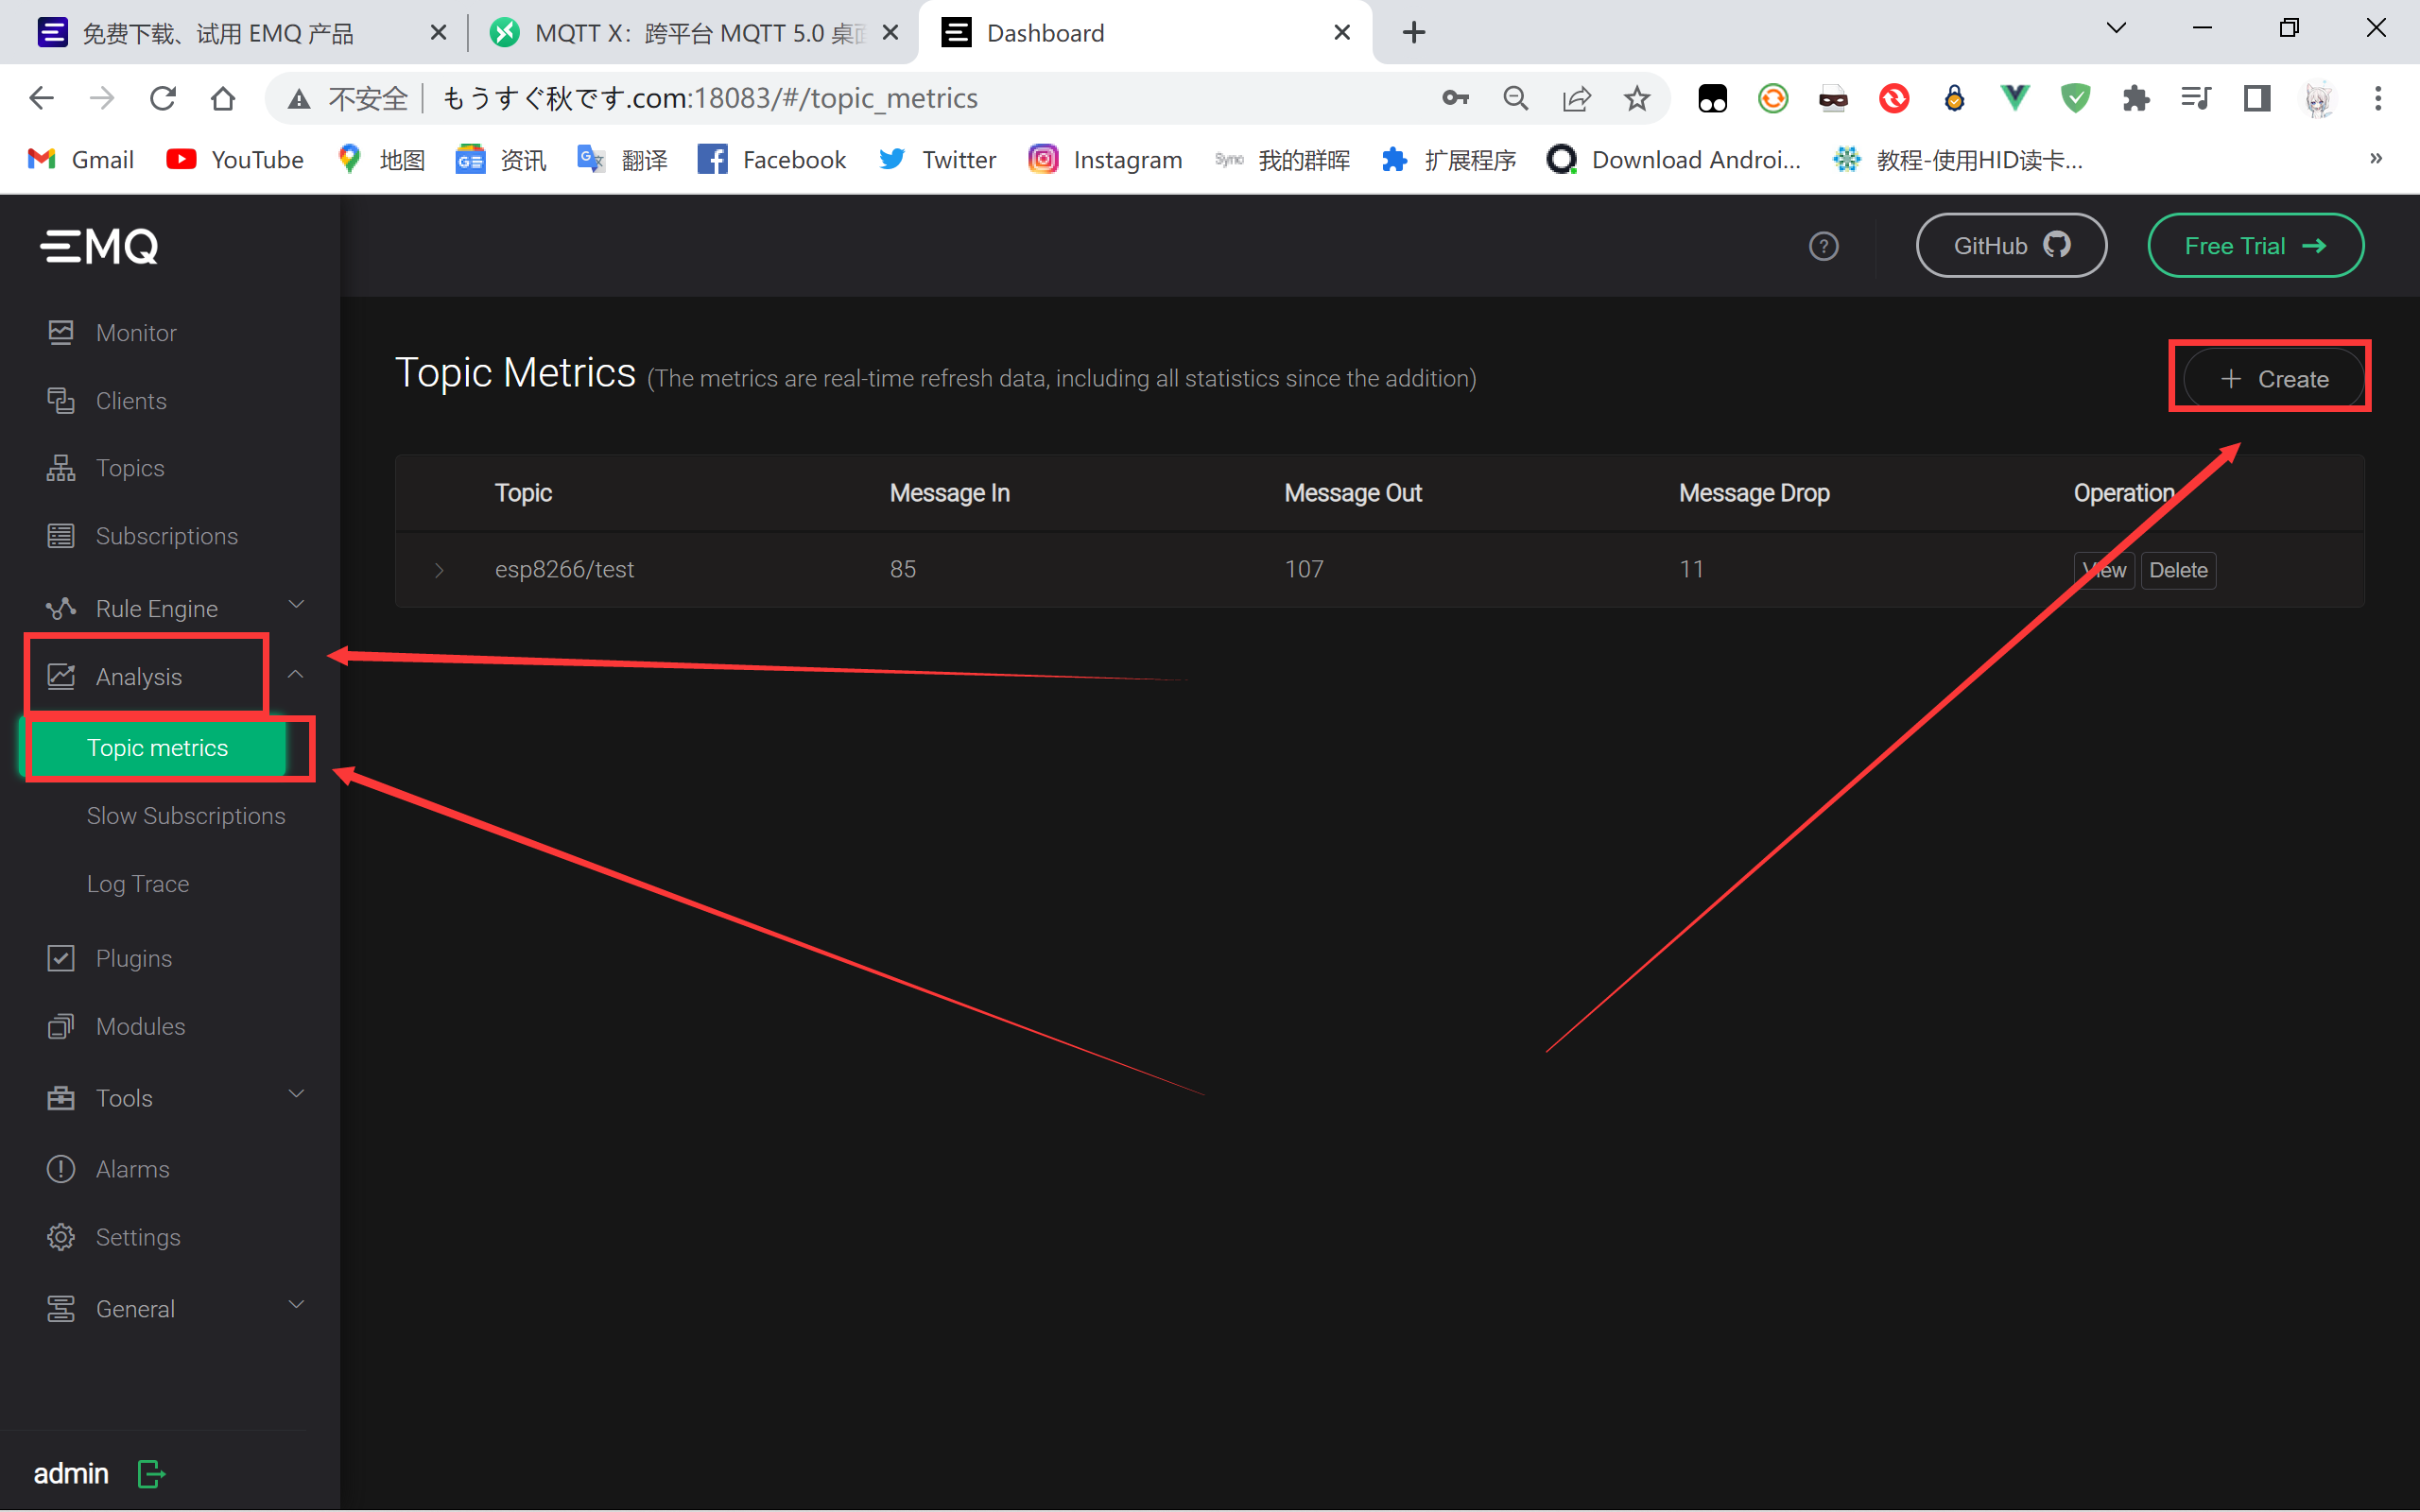
打开浏览器,输入服务器IP地址:18083或服务器绑定的域名:18083即可打开EMQX的控制面板,默认用户名为admin,密码为public,登陆后建议尽快修改密码(初始默认没有https,使用域名无法打开时应去掉https的s)

登陆后,点击左侧的Analysis – Topic metrics,点击右上角的Create来新建一个Topic
代码
打开Arduino,粘贴以下代码:
#include <ESP8266WiFi.h>
#include <PubSubClient.h>

// GPIO 5 D1
const int redLED = D0;
const int greenLED = D1;
const int blueLED = D2;

// WiFi
const char *ssid = "iPhone 13 Pro Max"; // Enter your WiFi name
const char *password = "123456789";  // Enter WiFi password

// MQTT Broker
const char *mqtt_broker = "";
const char *topic = "";
const char *mqtt_username = "";
const char *mqtt_password = "";
const int mqtt_port = 1883;

WiFiClient espClient;
PubSubClient client(espClient);

void setup() {
  pinMode(redLED, OUTPUT);
  pinMode(greenLED, OUTPUT);
  pinMode(blueLED, OUTPUT);

  digitalWrite(redLED, LOW);
  digitalWrite(greenLED, LOW);
  digitalWrite(blueLED, LOW);
  // Set software serial baud to 115200;
  Serial.begin(115200);
  // connecting to a WiFi network
  WiFi.begin(ssid, password);
  while (WiFi.status() != WL_CONNECTED) {
    delay(500);
    Serial.println("Connecting to WiFi..");
  }
  Serial.println("Connected to the WiFi network");
  //connecting to a mqtt broker
  client.setServer(mqtt_broker, mqtt_port);
  client.setCallback(callback);
  while (!client.connected()) {
    String client_id = "esp8266-client-";
    client_id += String(WiFi.macAddress());
    Serial.printf("The client %s connects to the public mqtt broker\n", client_id.c_str());
    if (client.connect(client_id.c_str(), mqtt_username, mqtt_password)) {
      Serial.println("Public emqx mqtt broker connected");
    } else {
      Serial.print("failed with state ");
      Serial.print(client.state());
      delay(2000);
    }
  }
  // publish and subscribe
  client.publish(topic, "hello emqx");
  client.subscribe(topic);
}

void callback(char *topic, byte *payload, unsigned int length) {
  Serial.print("Message arrived in topic: ");
  Serial.println(topic);
  Serial.print("Message:");
  String message;
  for (int i = 0; i < length; i++) {
    message = message + (char) payload[i];  // convert *byte to string
  }
  Serial.print(message);
  if (message == "on") {
    digitalWrite(redLED, HIGH);  // LED on
    digitalWrite(greenLED, HIGH);  // LED on
    digitalWrite(blueLED, HIGH);  // LED on
  }
  if (message == "off") {
    digitalWrite(redLED, LOW);  // LED off
    digitalWrite(greenLED, LOW);  // LED off
    digitalWrite(blueLED, LOW);  // LED off
  }
  Serial.println();
  Serial.println("-----------------------");
}

void loop() {
  client.loop();
}
注:同样地,在使用之前需要将第10行的WiFi名称修改为自己的WiFi名称、将第11行的WiFi密码修改为自己的WiFi密码;与此同时,需要在第14行填入自己的EMQX服务器域名(不用写http/s)、第15行填入刚刚创建的Topic名称、第16行填入登录控制面板的用户名、第17行填入登陆控制面板的密码
烧录
完成修改后,点击左上角的上传即可开始编译烧录
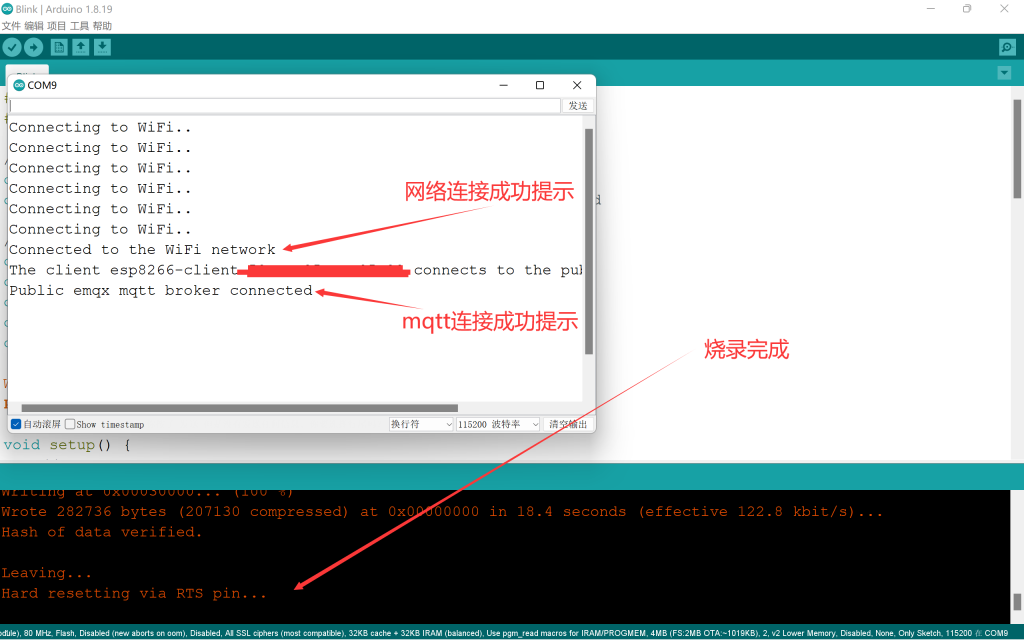
烧录完成后点击右上角的串口监视器,看到如下提示即为连接成功(如果没有可以按一下开发板上的RST按钮来重启开发板)
安装并配置MQTT X调试工具
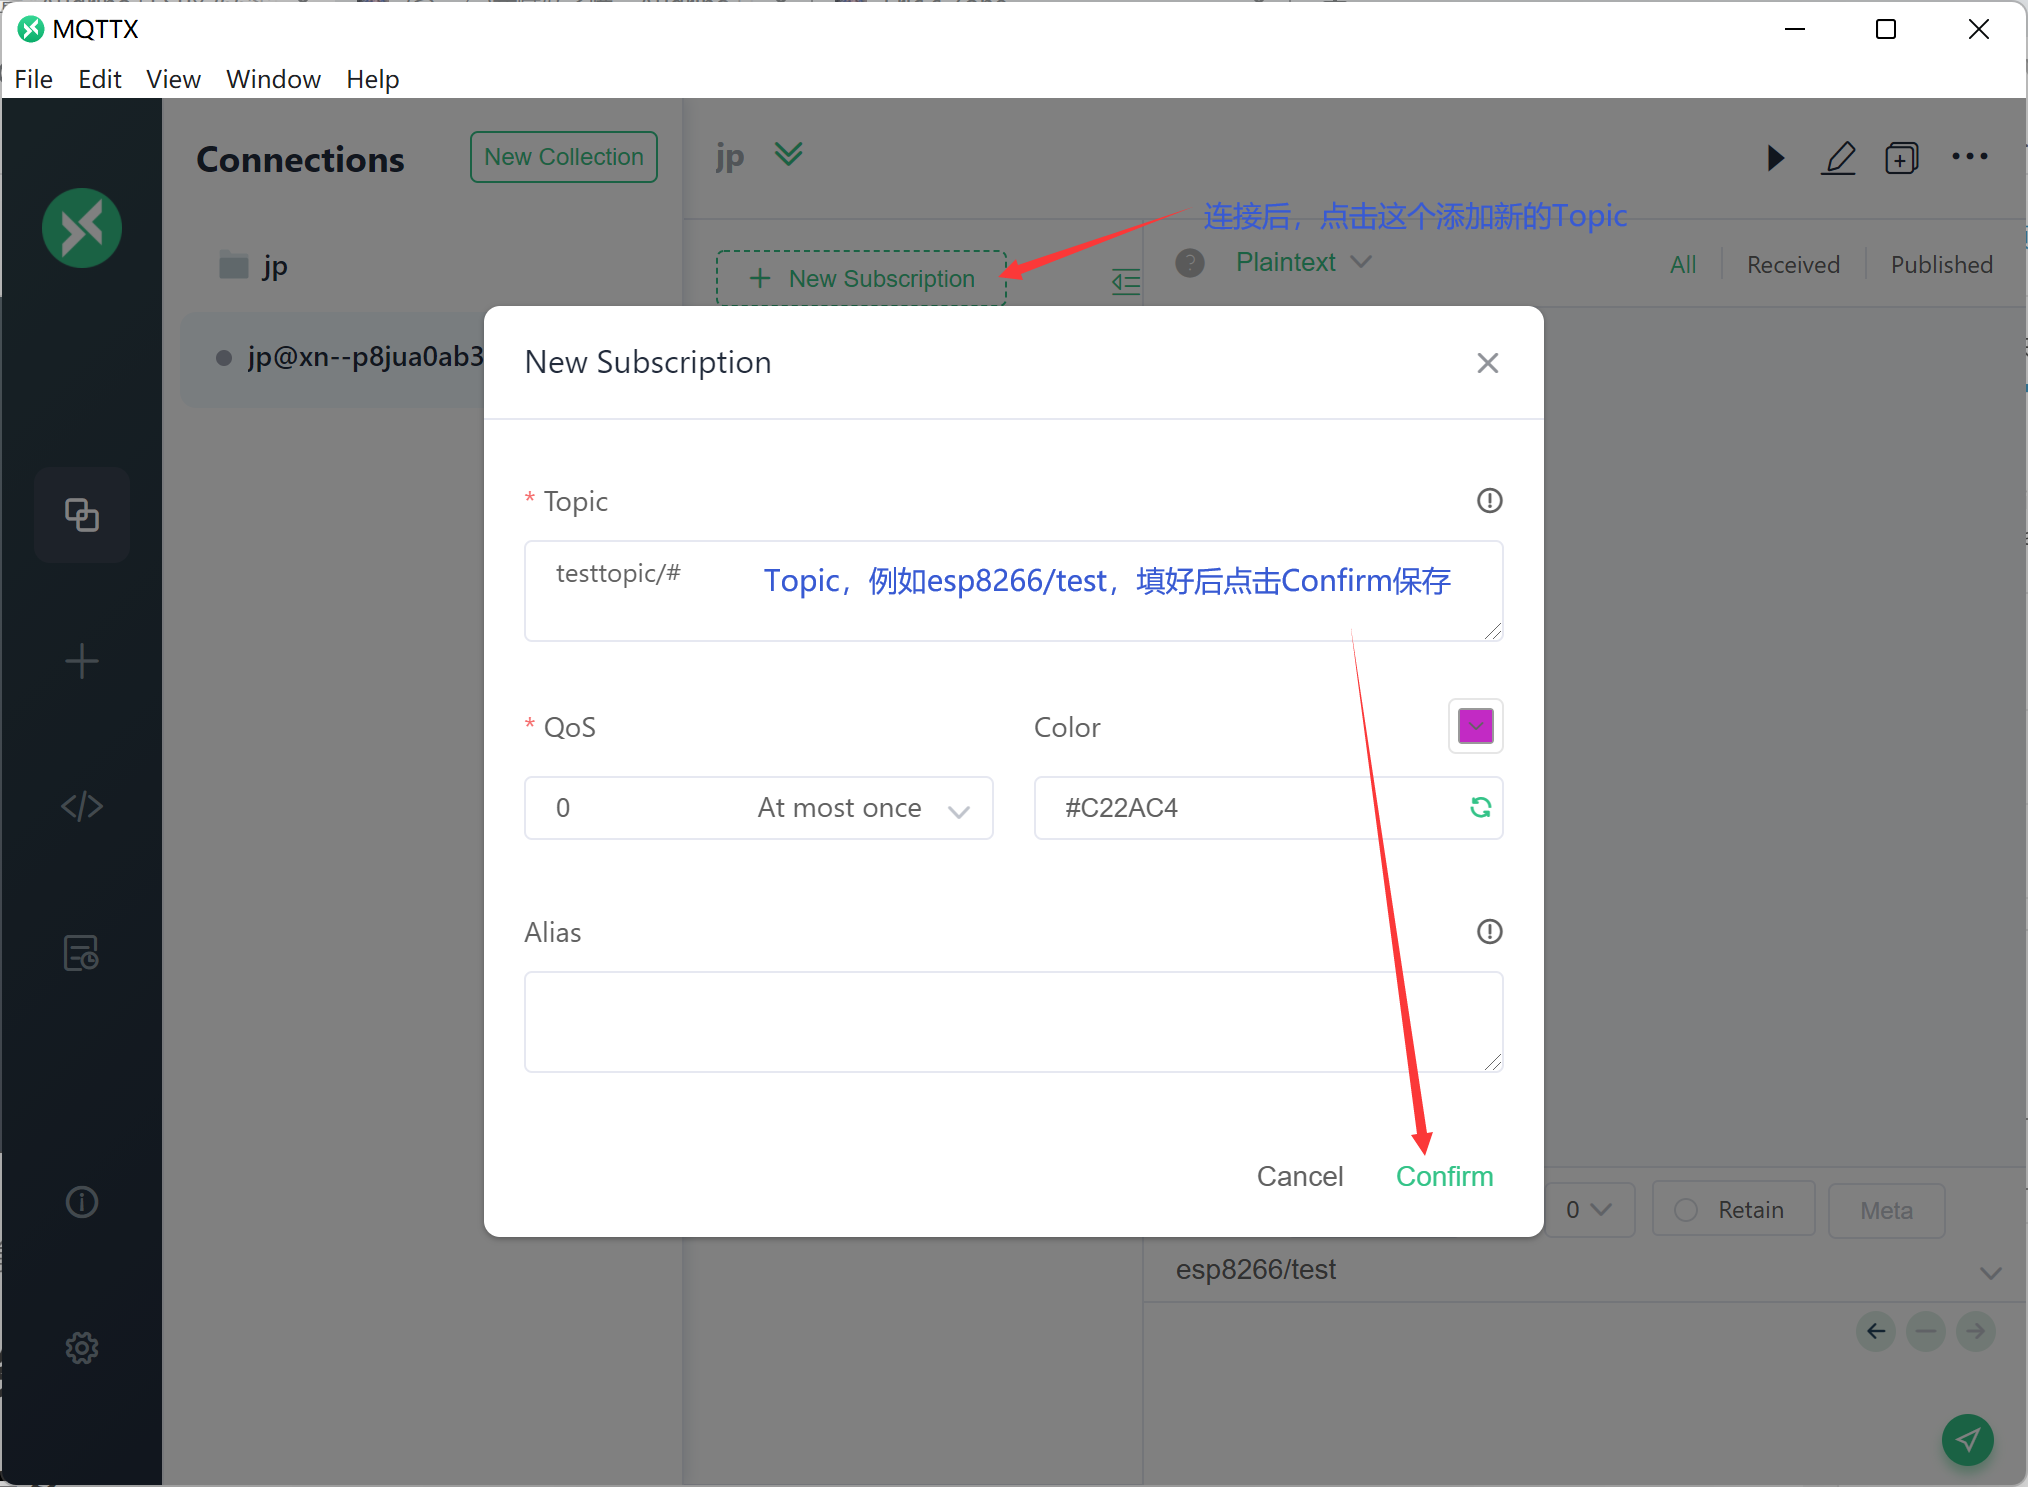
下载安装一个MQTT X用于远程调试

打开软件,按照下图输入相应的参数来连接EMQX:


实现功能
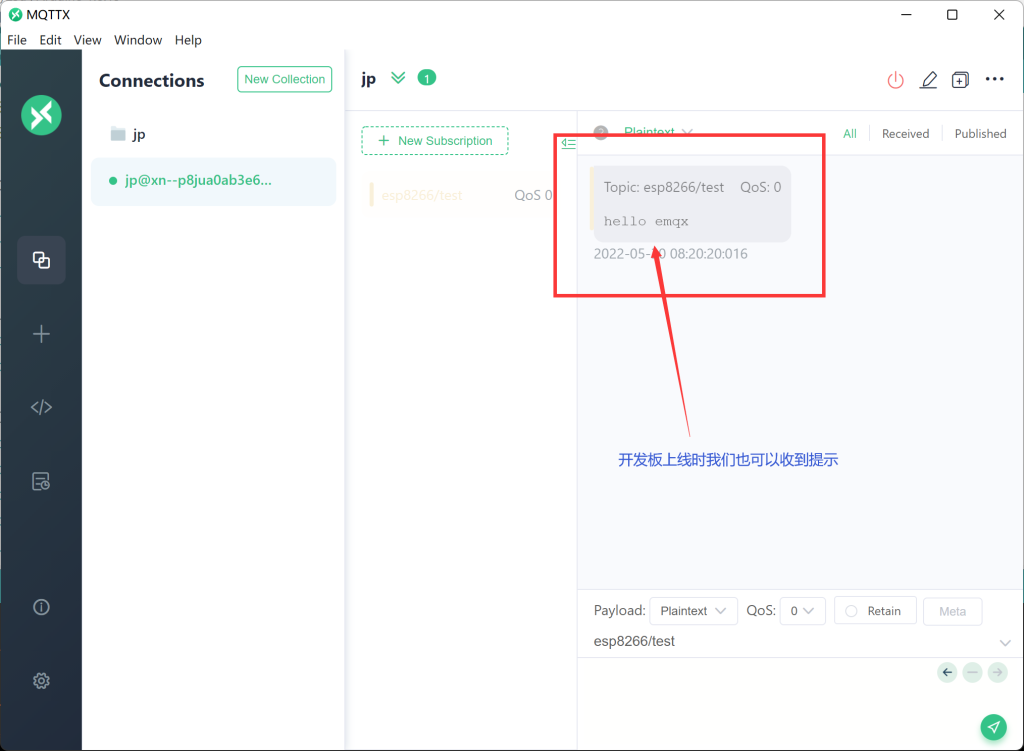
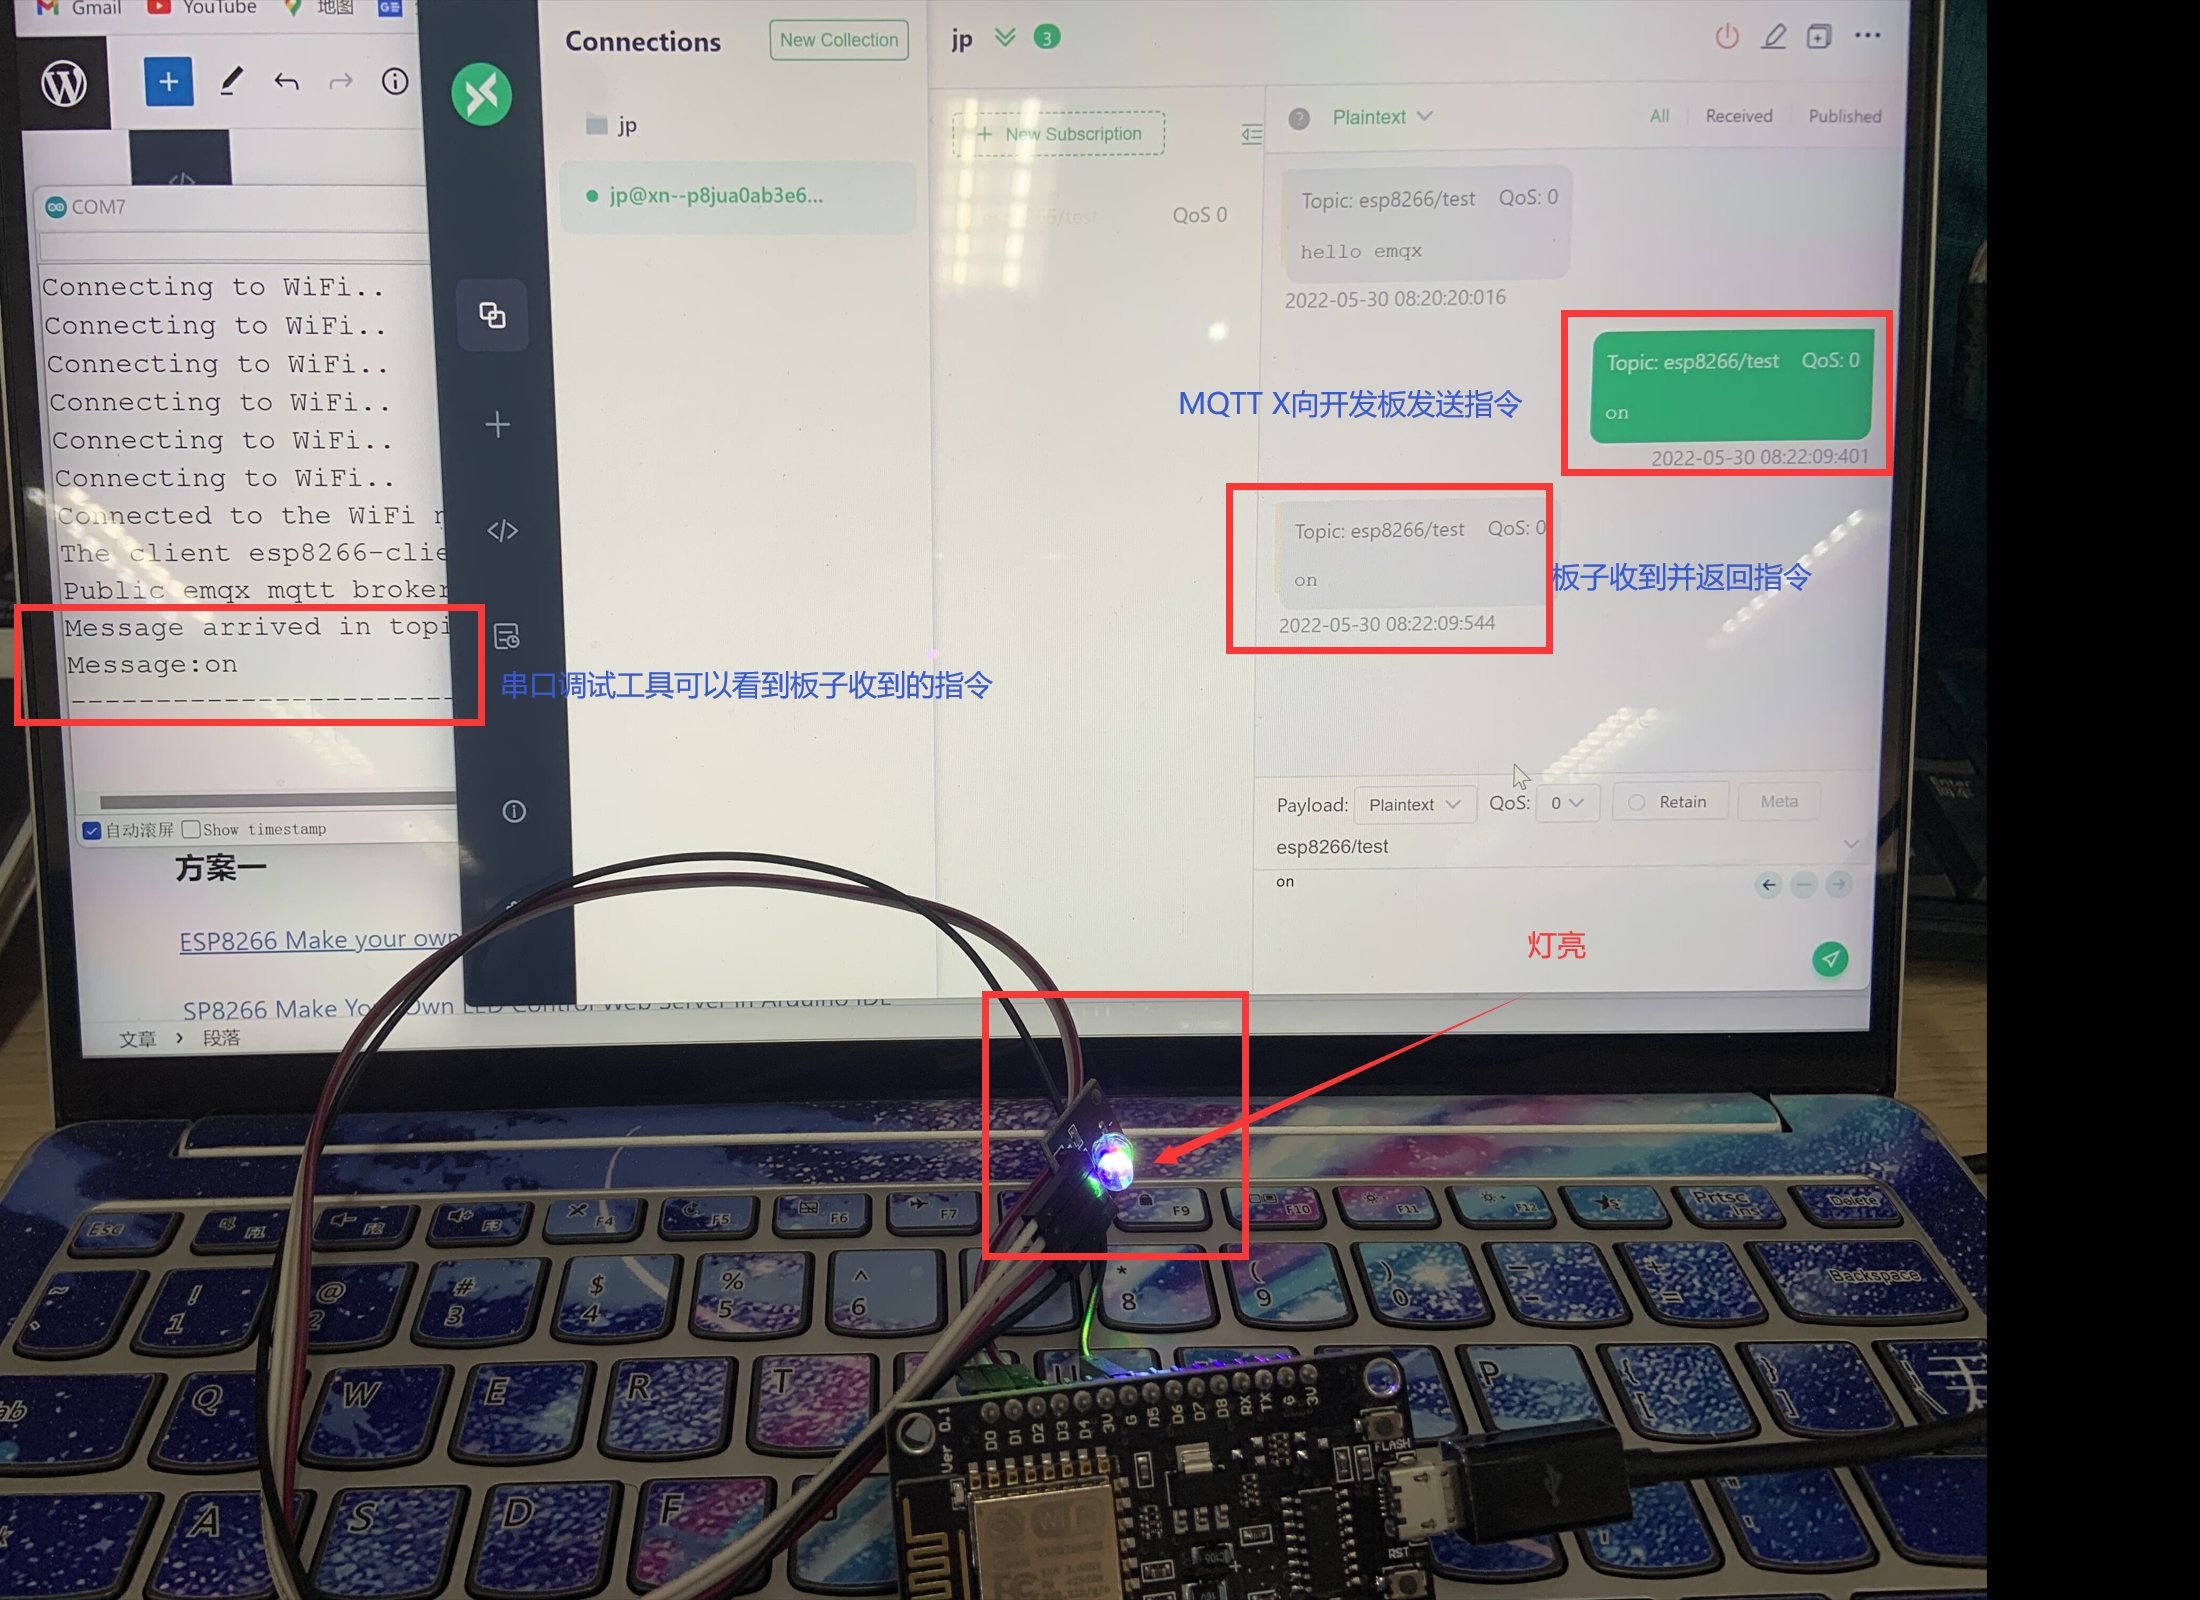
如果一切配置无误,此时您在此处发送on或off就能控制灯的开关了

不过仅仅只有这些显然不够看,下面讲述如何连接微信小程序进行远程控制。
使用微信小程序控制
打开微信开发者工具,新建一个小程序,并插入以下代码:
Wxml:
<!--index.wxml-->
<view class="title">微信端控制台</view>
<view class="container">
  <view class="is-flex">
    <button type="primary" bindtap="connect">{{ conenctBtnText }}</button>
    <button type="warn" disabled="{{ conenctBtnText === '连接' }}" bindtap="disconnect">断开连接</button>
  </view>
  <view class="is-flex mt50">
    <button type="primary" bindtap="publishOn">开启</button>
    <button type="primary" bindtap="publishOff">关闭</button>
  </view>
</view>
Wxss:
/**index.wxss**/
input,
.received-msg-box {
  width: 100%;
  border: 1px solid #d7dae1;
  border-radius: 8rpx;
  padding: 0 20rpx;
  box-sizing: border-box;
  font-size: 28rpx;
  min-height: 64rpx;
  margin-bottom: 20rpx;
}

.received-msg-box {
  padding: 20rpx;
  min-height: 300rpx;
}

.label {
  font-size: 26rpx;
  color: #848587;
  margin-bottom: 12rpx;
}

.is-flex {
  display: flex;
  justify-content: space-between;
  margin-bottom: 20rpx;
}

.mt50 {
  margin-top: 150rpx;
}

button[type="primary"],
button[type="warn"] {
  width: 40% !important;
  font-size: 28rpx;
  font-weight: normal;
  margin: 0 !important;
}

.title {
  width: 150px;
  height: 20px;
  line-height: 20px;
  margin: 0 auto;
  margin-top: 160rpx;
  text-align: center;
  font-size: 50rpx;
}
js:
// index.js

import mqtt from "../../utils/mqtt.min.js";
Page({
  data: {
    client: null,
    host: "",
    subTopic: "",
    pubTopic: "",
    pubMsg: "",
    conenctBtnText: "连接",
    mqttOptions: {
      username: "admin",
      password: "Mrliang688",
      reconnectPeriod: 1000, // 1000毫秒,设置为 0 禁用自动重连,两次重新连接之间的间隔时间
      connectTimeout: 30 * 1000, // 30秒,连接超时时间
      // 更多参数请参阅 MQTT.js 官网文档:https://github.com/mqttjs/MQTT.js#mqttclientstreambuilder-options
      // 更多 EMQ 相关 MQTT 使用教程可在 EMQ 官方博客中进行搜索:https://www.emqx.com/zh/blog
    },
  },

  setValue(key, value) {
    this.setData({
      [key]: value,
    });
  },
  setHost(e) {
    this.setValue("host", e.detail.value);
  },
  setSubTopic(e) {
    this.setValue("subTopic", e.detail.value);
  },
  setPubTopic(e) {
    this.setValue("pubTopic", e.detail.value);
  },
  setPubMsg(e) {
    this.setValue("pubMsg", e.detail.value);
  },
  setRecMsg(msg) {
    this.setValue("receivedMsg", msg);
  },

  connect() {
    // MQTT-WebSocket 统一使用 /path 作为连接路径,连接时需指明,但在 EMQX Cloud 部署上使用的路径为 /mqtt
    // 因此不要忘了带上这个 /mqtt !!!
    // 微信小程序中需要将 wss 协议写为 wxs,且由于微信小程序出于安全限制,不支持 ws 协议
    try {
      this.setValue("conenctBtnText", "连接中...");
      const clientId = new Date().getTime();
      this.data.client = mqtt.connect(`wxs://${this.data.host}:8084/mqtt`, {
        ...this.data.mqttOptions,
        clientId,
      });

      this.data.client.on("connect", () => {
        wx.showToast({
          title: "连接成功",
        });
        this.setValue("conenctBtnText", "连接成功");

        this.data.client.on("message", (topic, payload) => {
          wx.showModal({
            content: `收到消息 - Topic: ${topic},Payload: ${payload}`,
            showCancel: false,
          });
          const currMsg = this.data.receivedMsg ? `<br/>${payload}` : payload;
          this.setValue("receivedMsg", this.data.receivedMsg.concat(currMsg));
        });

        this.data.client.on("error", (error) => {
          this.setValue("conenctBtnText", "连接");
          console.log("onError", error);
        });

        this.data.client.on("reconnect", () => {
          this.setValue("conenctBtnText", "连接");
          console.log("reconnecting...");
        });

        this.data.client.on("offline", () => {
          this.setValue("conenctBtnText", "连接");
          console.log("onOffline");
        });
        // 更多 MQTT.js 相关 API 请参阅 https://github.com/mqttjs/MQTT.js#api
      });
    } catch (error) {
      this.setValue("conenctBtnText", "连接");
      console.log("mqtt.connect error", error);
    }
  },

  subscribe() {
    if (this.data.client) {
      this.data.client.subscribe(this.data.subTopic);
      wx.showModal({
        content: `成功订阅主题:${this.data.subTopic}`,
        showCancel: false,
      });
      return;
    }
    wx.showToast({
      title: "请先点击连接",
      icon: "error",
    });
  },

  unsubscribe() {
    if (this.data.client) {
      this.data.client.unsubscribe(this.data.subTopic);
      wx.showModal({
        content: `成功取消订阅主题:${this.data.subTopic}`,
        showCancel: false,
      });
      return;
    }
    wx.showToast({
      title: "请先点击连接",
      icon: "error",
    });
  },

  publishOn() {
    if (this.data.client) {
      this.data.client.publish(this.data.pubTopic, 'on');
      return;
    }
    wx.showToast({
      title: "请先点击连接",
      icon: "error",
    });
  },

  publishOff() {
    if (this.data.client) {
      this.data.client.publish(this.data.pubTopic, 'off');
      return;
    }
    wx.showToast({
      title: "请先点击连接",
      icon: "error",
    });
  },

  disconnect() {
    this.data.client.end();
    this.data.client = null;
    this.setValue("conenctBtnText", "连接");
    wx.showToast({
      title: "成功断开连接",
    });
  },
});
注:
- 需要在
utils文件夹放入一个mqtt.min.js,链接:点击下载 index.js第7行需要填入自己的服务器IP地址/域名(填写域名时不用加http/s)index.js第8行、第9行需要填入自己开发板的Topic
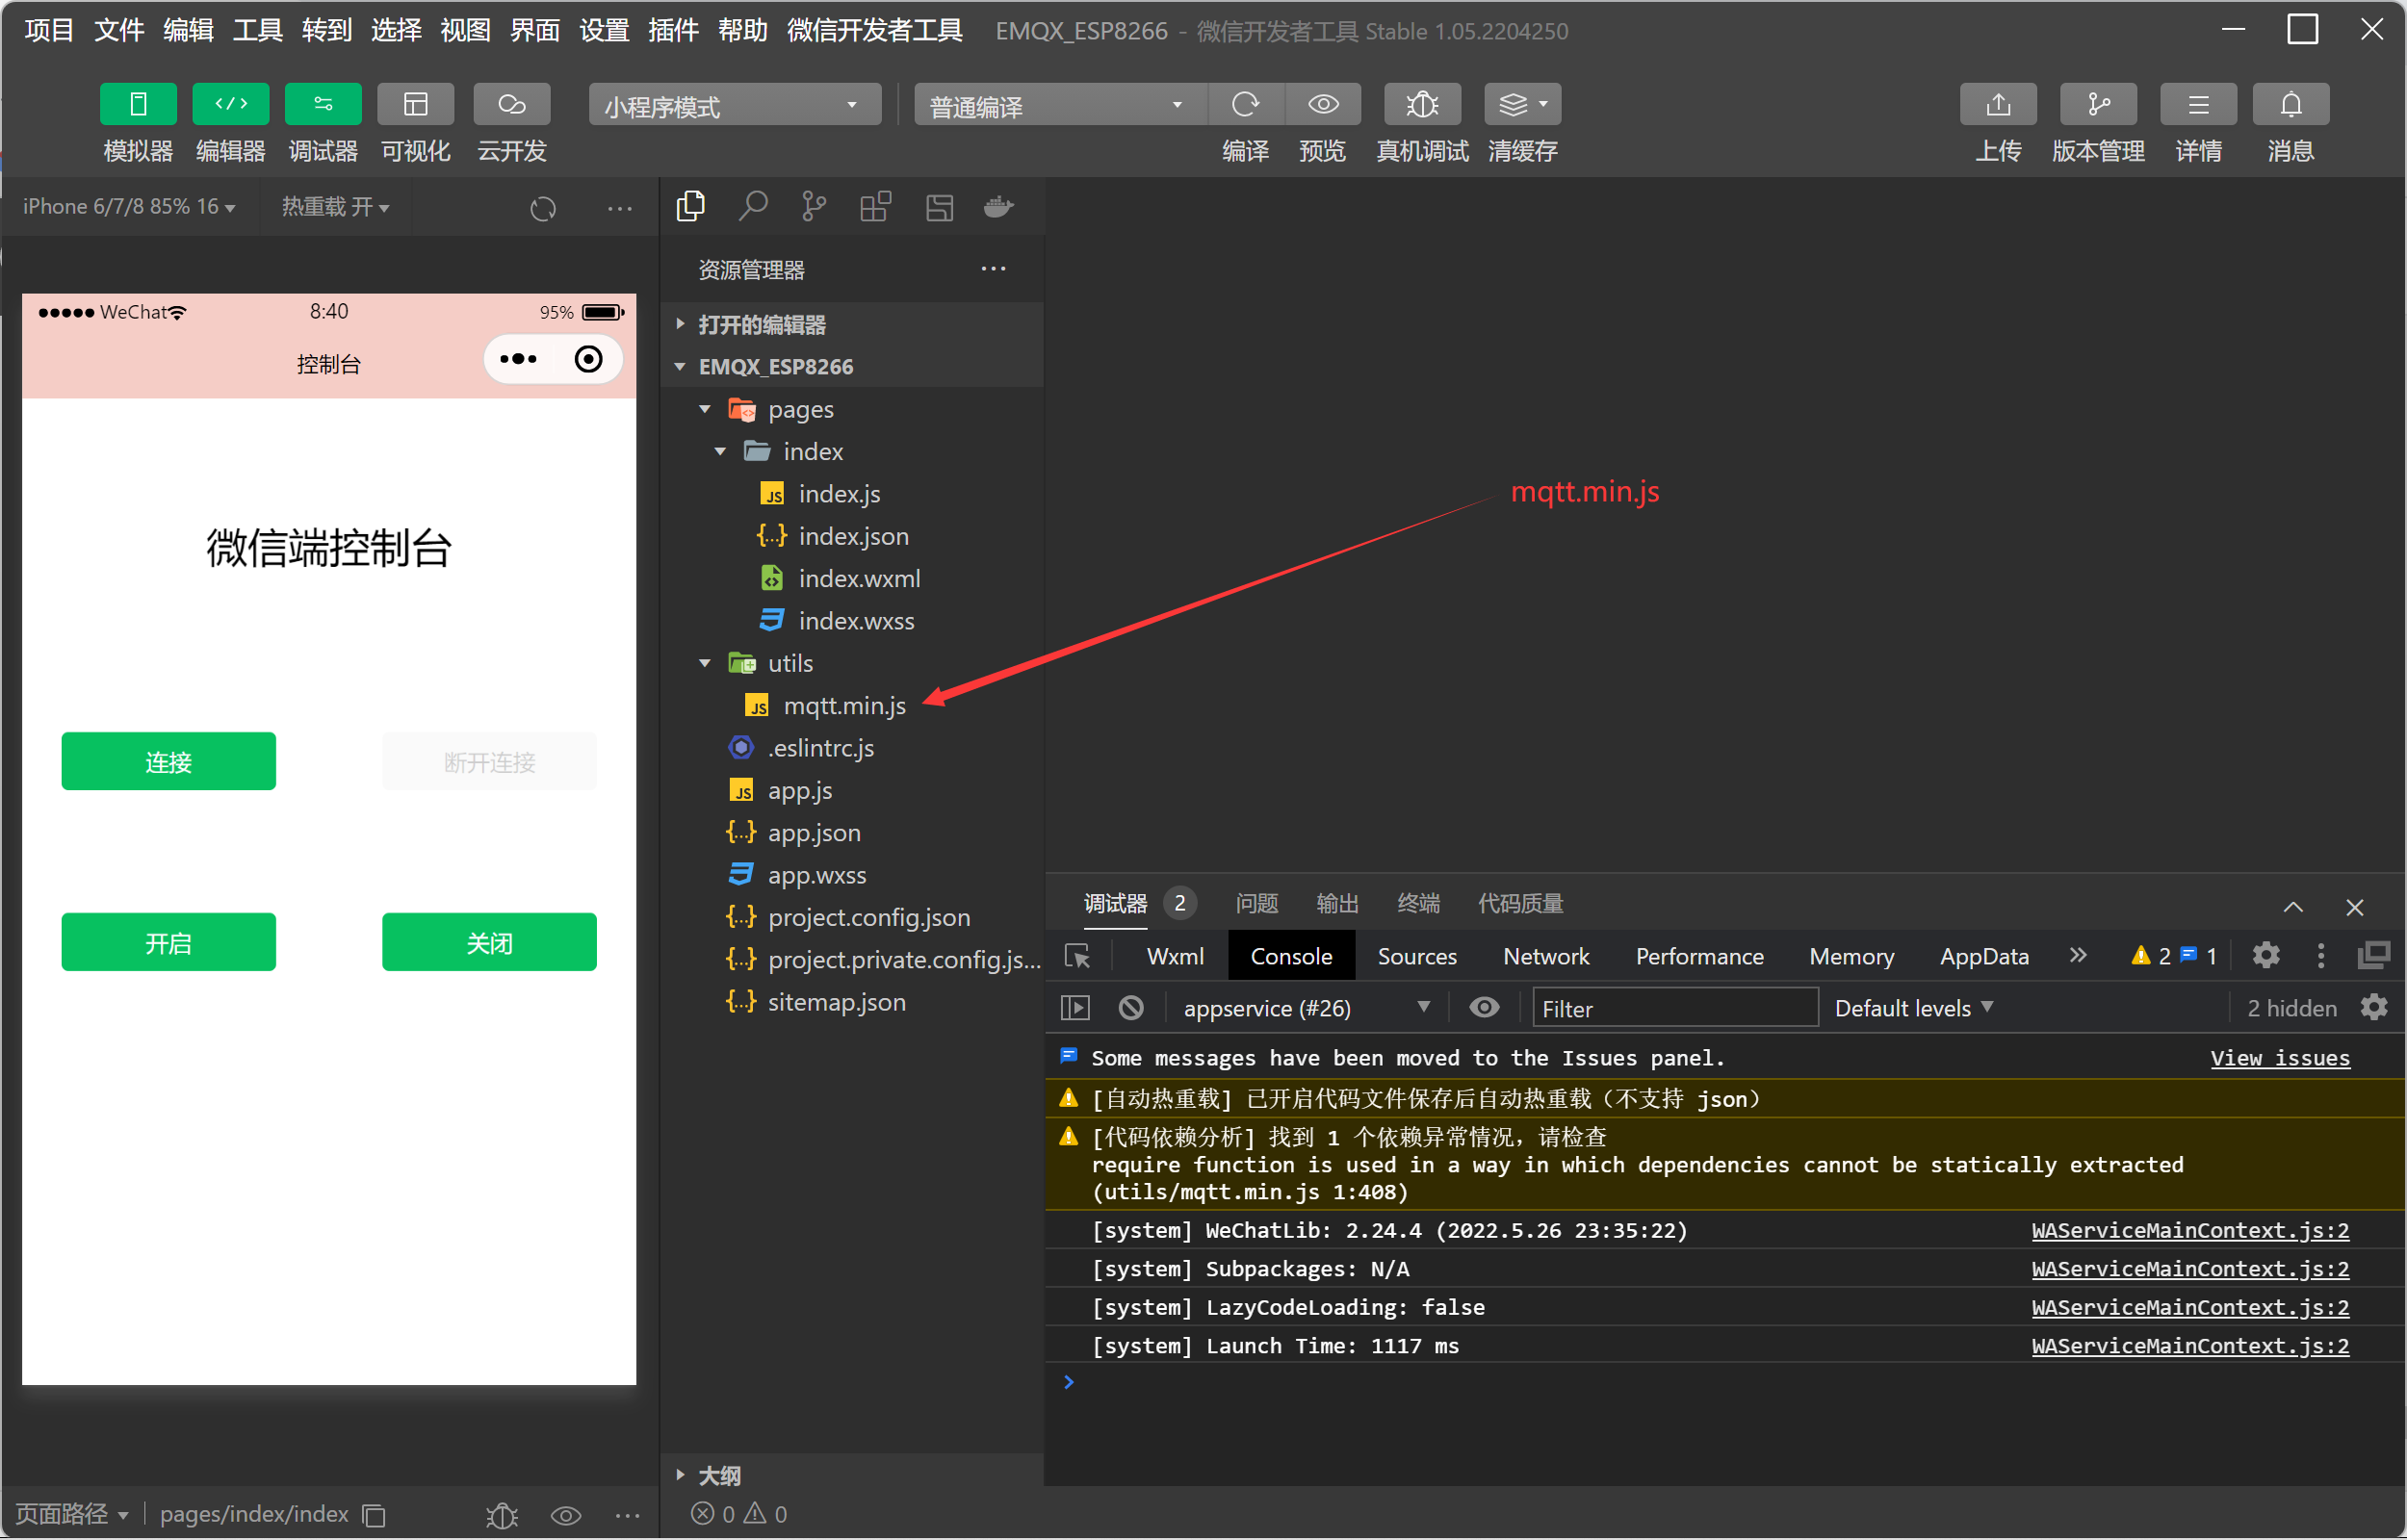
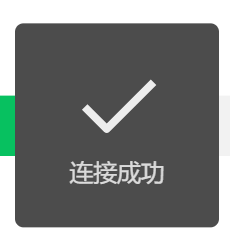
此时我们点击连接,收到连接成功的提示后就可以通过下面的“开启”按钮和“关闭”按钮来控制灯的开关了。
教程到这里就结束了,希望能够对你有所帮助。
资料来源
方案一
ESP8266 Make your own LED control web server in Arduino IDE | IoT project – YouTube
SP8266 Make Your Own LED Control Web Server in Arduino IDE
方案二
ESP8266 + MQTT :如何实现 LED 灯的远程控制
(↑不过这一篇有问题,需要修改一下才能控制灯的开关↑)
本文地址: Audrino+ESP8266实现控制LED灯的开关